Studio: review, edit, and export
Video walkthrough: explore Studio, style captions, adjust the frame, and add a section from the transcript. Use fullscreen to read the controls. The recording uses different demo footage from the written examples below.
Studio is the last-mile editing workspace for videos created in Composer. It keeps the script, preview, timeline, captions, brand treatment, revision history, and renders in one place, so you can finish a draft without rebuilding it from scratch.
The examples below use Nina (2025), a live-action English short drama, in
public-docs-demo. These are real in-app browser captures, normalized by one
pixel to the requested 2555 × 1508 reference frame. Numbered markers explain
controls; the interface and video content have not been mocked.
Select any screenshot to open the full-size image in a new tab.
Footage and reuse conditions: Demo media and credits. The screenshots show successive edits, not one unchanged project state.
Before you edit: wait for caching
When a project opens—or after a visual change—Studio may show Caching clips. Wait until caching finishes and Play becomes available before judging playback. Editing while the preview is still caching can make a correct change look incomplete.
If a generated project has no body footage, return to the originating Produce or Long to Short job and confirm that generation has finished before reopening Studio.
Tour the workspace
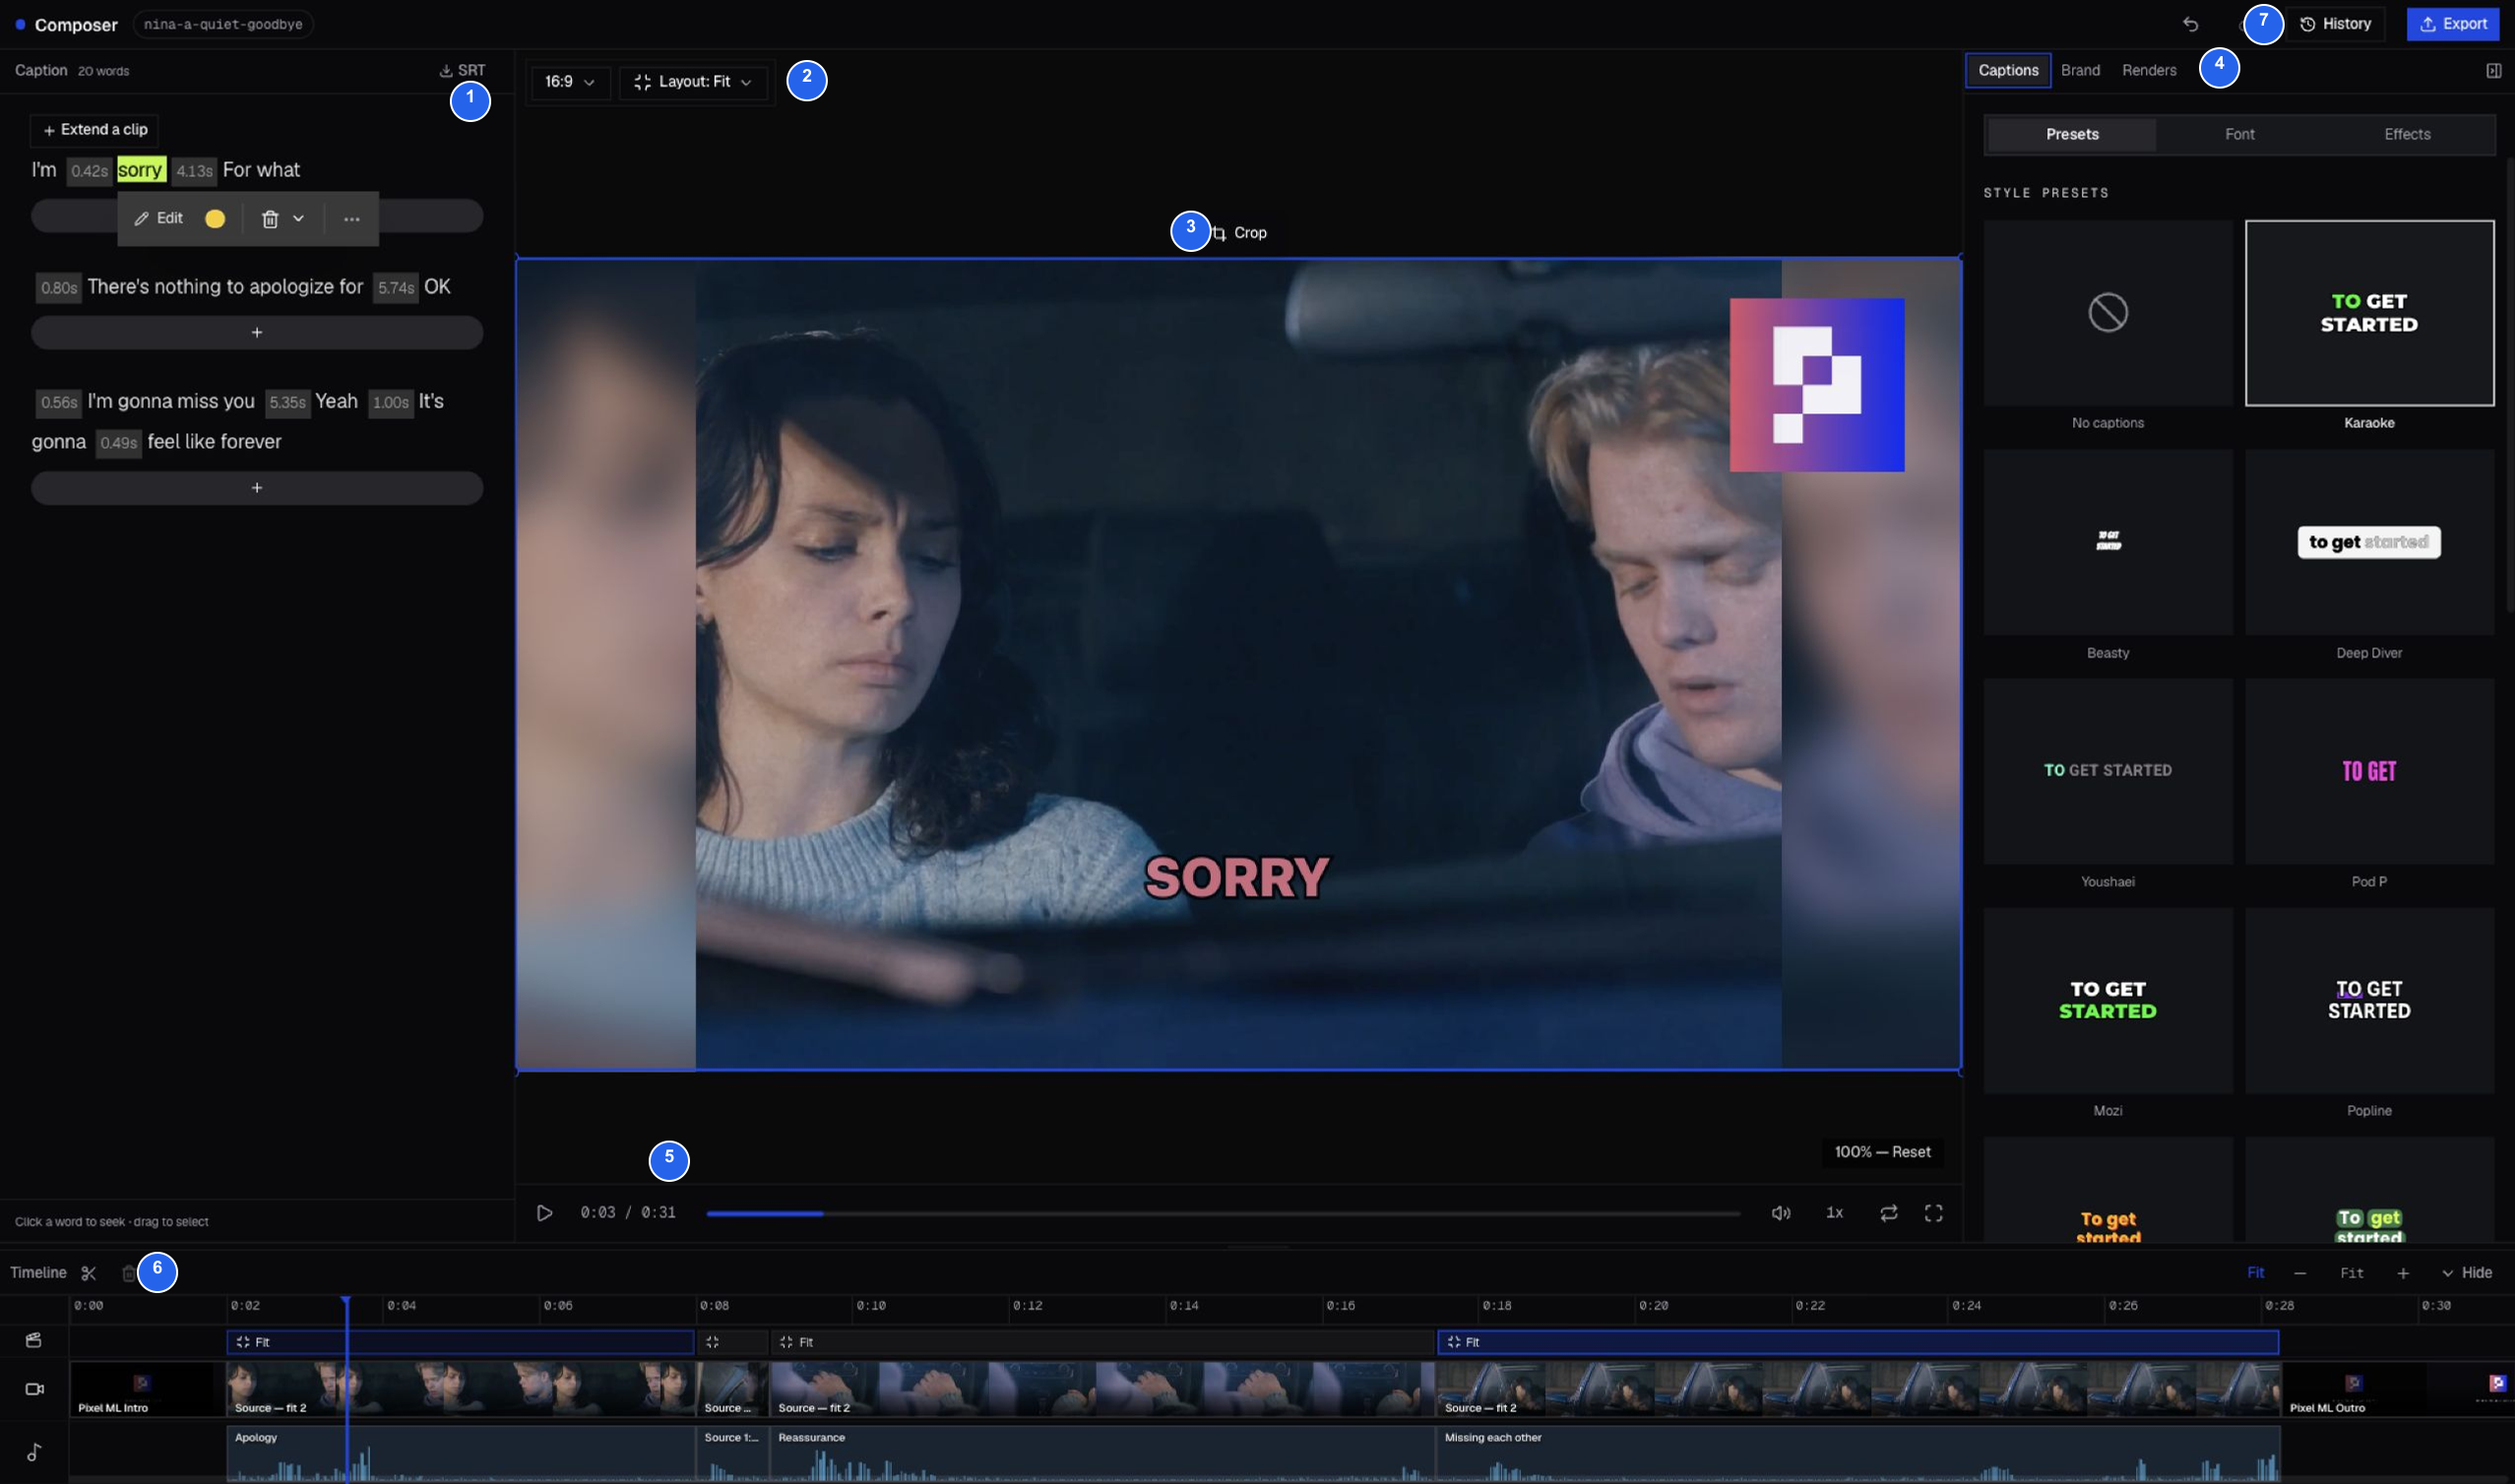
| # | Area | What it is for |
|---|---|---|
| 1 | Script | Seek by word, select a phrase, edit caption text, highlight words, remove captions, or cut a spoken span from the video. |
| 2 | Aspect and layout | Set the output shape and choose how footage fills each scene. |
| 3 | Preview and Crop | Check the current frame and adjust its visible crop. |
| 4 | Captions, Brand, and Renders | Style subtitles, apply reusable brand assets, and create downloadable output files. |
| 5 | Player controls | Play, scrub, mute, change speed, loop, and enter fullscreen. |
| 6 | Timeline | Review scene boundaries, caption timing, audio, and the current playhead position. |
| 7 | History and Export | Inspect earlier revisions; Export starts rendering immediately using the current output settings. |
Start every review with one uninterrupted play-through. Confirm that picture, audio, captions, and the playhead advance together before making changes.
Edit from the script
The Script panel is both a transcript and an edit surface. Clicking a word seeks the preview to that word; dragging across words opens the selection toolbar.
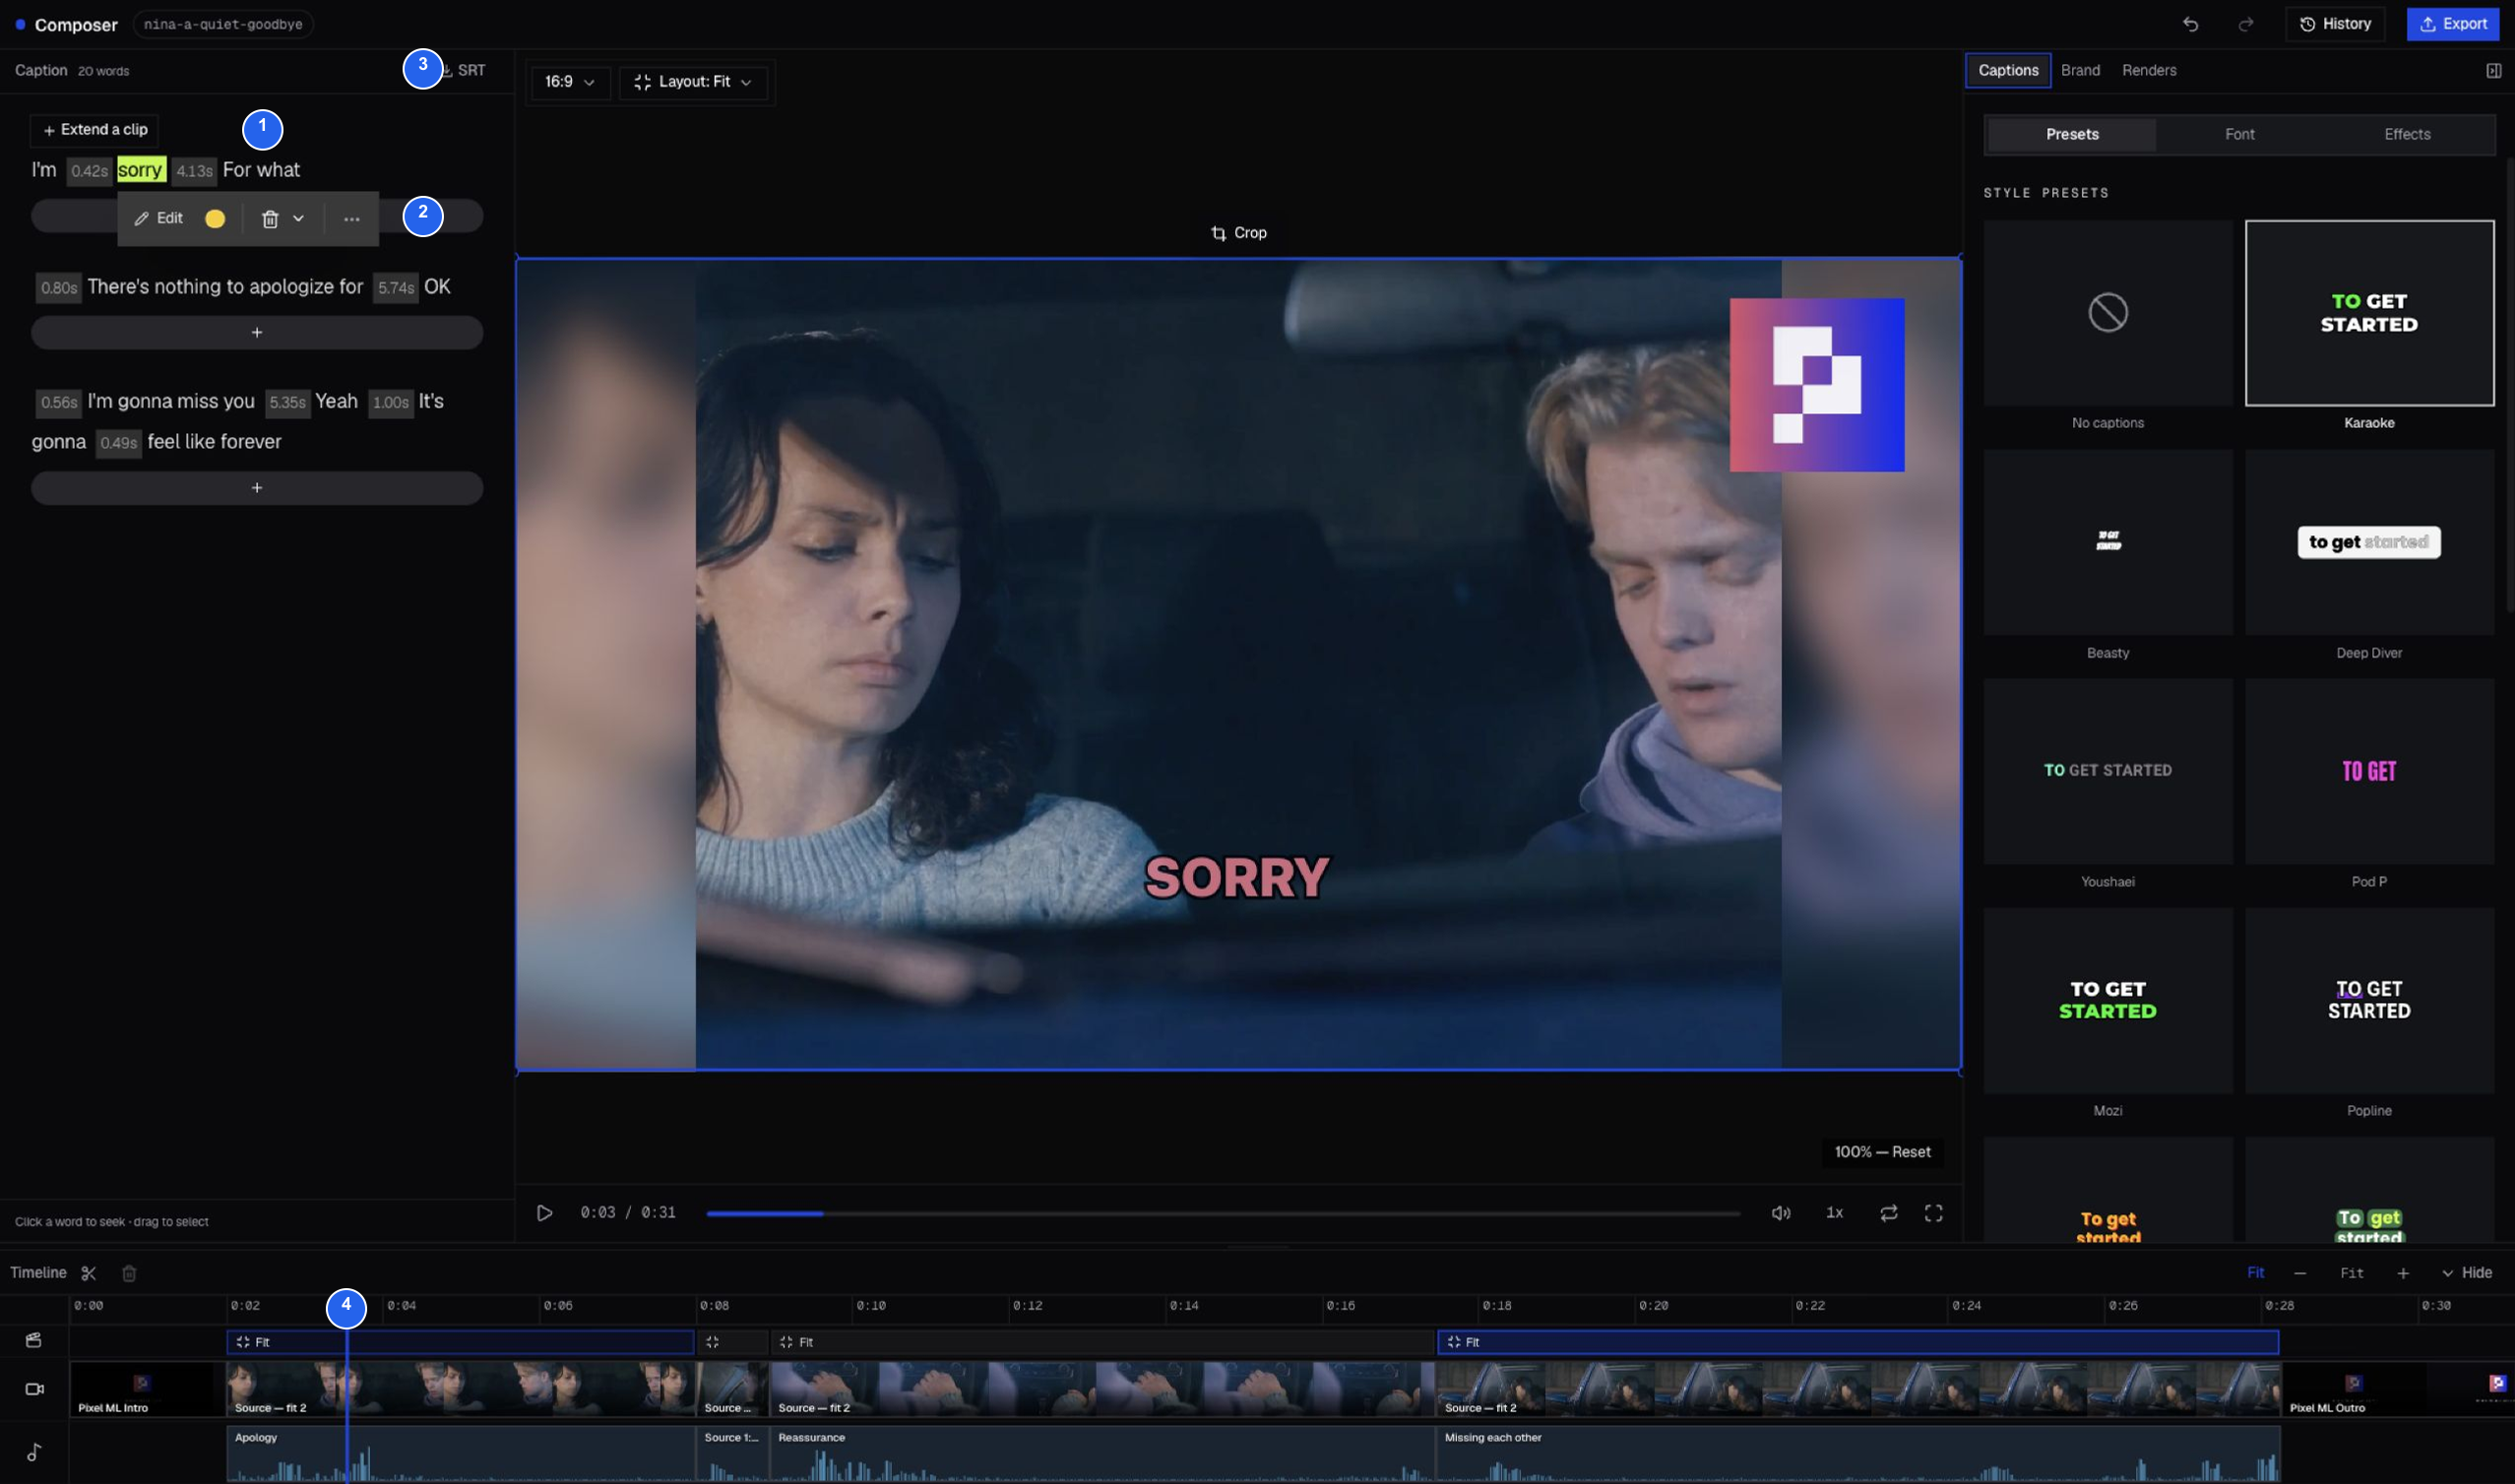
| # | Control | How to use it |
|---|---|---|
| 1 | Word selection | Drag from the first word to the last word you want to change. |
| 2 | Selection toolbar | Edit the text, apply or clear a highlight, hide the selected caption words, or remove the caption and matching video span. |
| 3 | SRT | Download the current subtitles as a .srt file. |
| 4 | Synced playhead | The script selection, preview, and timeline all refer to the same point in the edit. |
Edit changes the visible caption text without replacing the source audio. Remove caption hides only the selected words. Remove caption & video cuts the selected time range from every lane and closes the gap, so use it only when you want to shorten the story.
After a script edit, play from a few seconds before the change through the next scene. This catches awkward cuts and caption timing issues quickly.
Add a section from the source transcript
Use Extend a clip when the current cut is missing useful material from its source video. Choose the Extend a clip button at the point where the new section should appear, then select an unused transcript range.
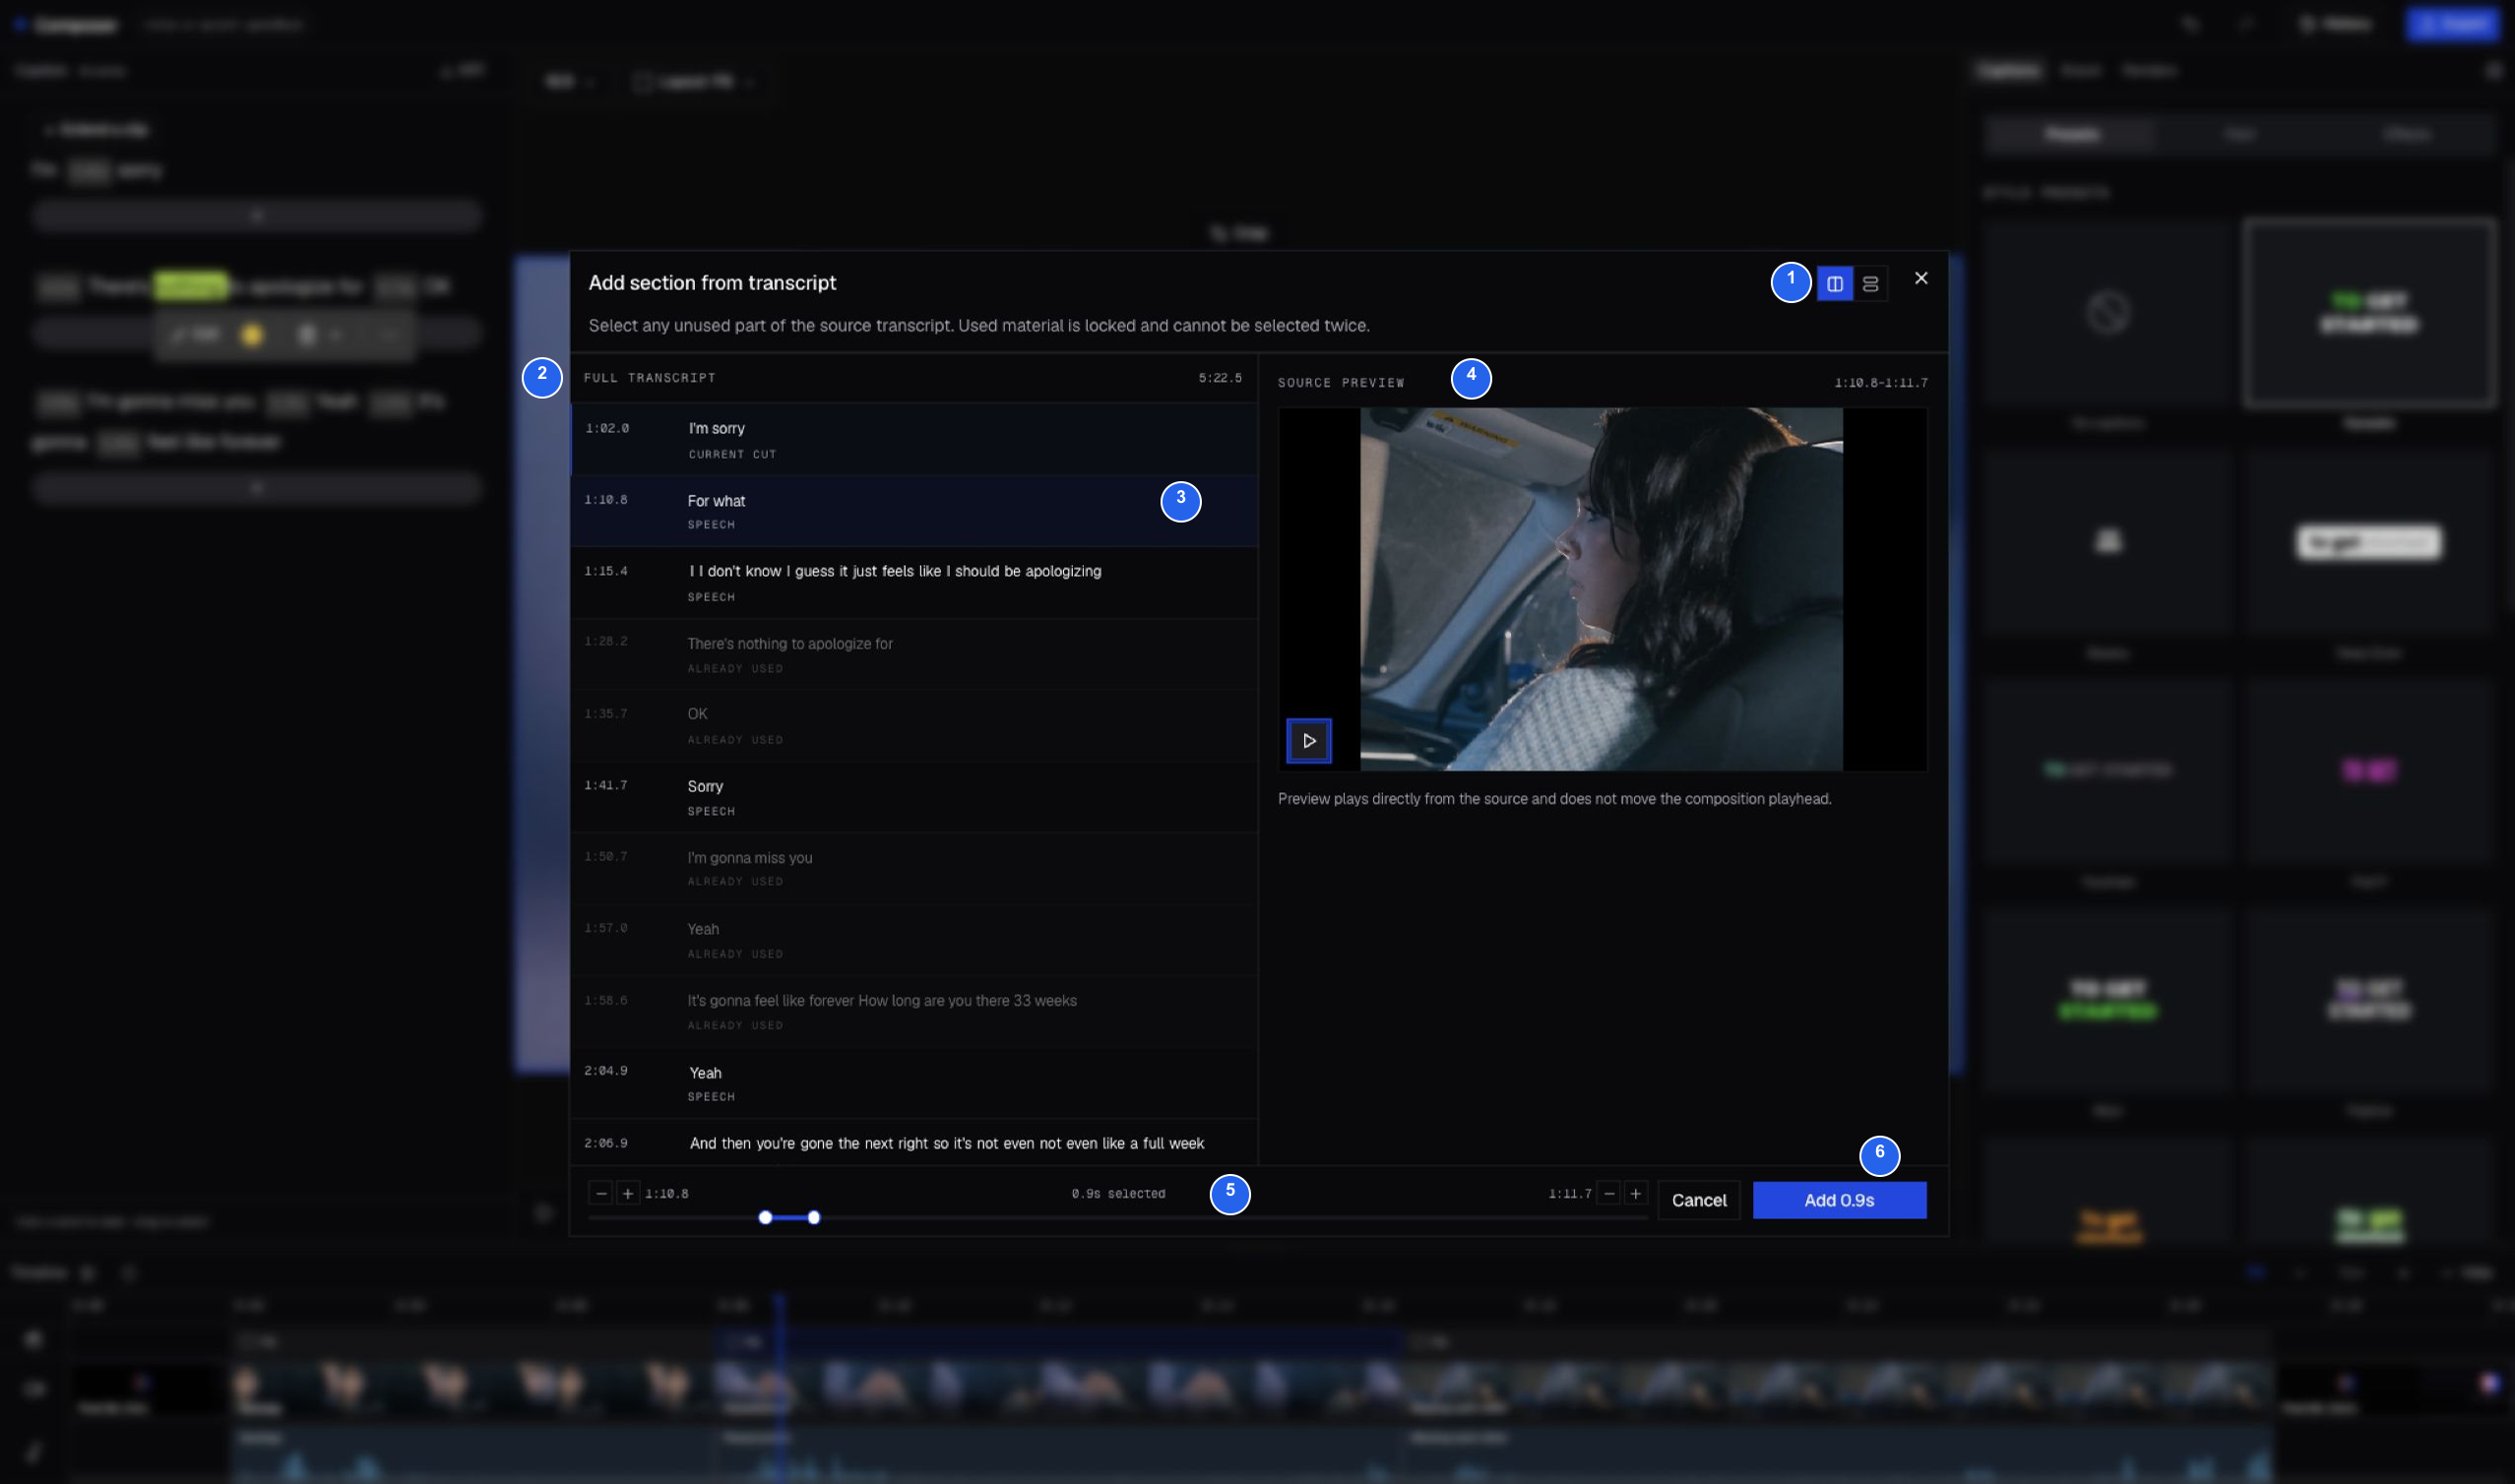
| # | Control | How to use it |
|---|---|---|
| 1 | View mode | Use Side by side to keep the transcript and source preview visible together, or Caption only to give the transcript more room. |
| 2 | Full transcript | Browse the source transcript and its original timestamps. Already used material is locked; Current cut marks the nearby section already in the composition. |
| 3 | Selected words | Click a word or phrase from an unused row to start the source range. The highlighted words show what will become the new caption. |
| 4 | Source preview | Play the selected source range before adding it. This preview reads directly from the source and does not move the composition playhead. |
| 5 | Range controls | Drag the two handles or use the minus and plus buttons to adjust the start and end in 200 ms steps. Check the selected duration in the center. |
| 6 | Add duration | Select Add _x.x_s to insert exactly that source range at the chosen Extend a clip position. |
Composer prevents the same source material from being selected twice. Before adding, check that the first and last spoken words are complete and that the preview does not begin or end mid-action. After insertion and caching, play through the previous section, the new material, and the following section to check continuity.
In this example, selecting “For what” after the first apology, extending the end twice by 200 ms to the displayed 1:10.8–1:11.7 range, and choosing Add 0.9s inserted the missing response. The draft increased from 18 to 20 caption words and from approximately 30 to 31 seconds. The workspace image above shows this later state. Play the new join before making another edit.
Choose the output shape
Aspect ratio changes the canvas for the whole project. Choose the target platform first, then review layout and crop scene by scene.
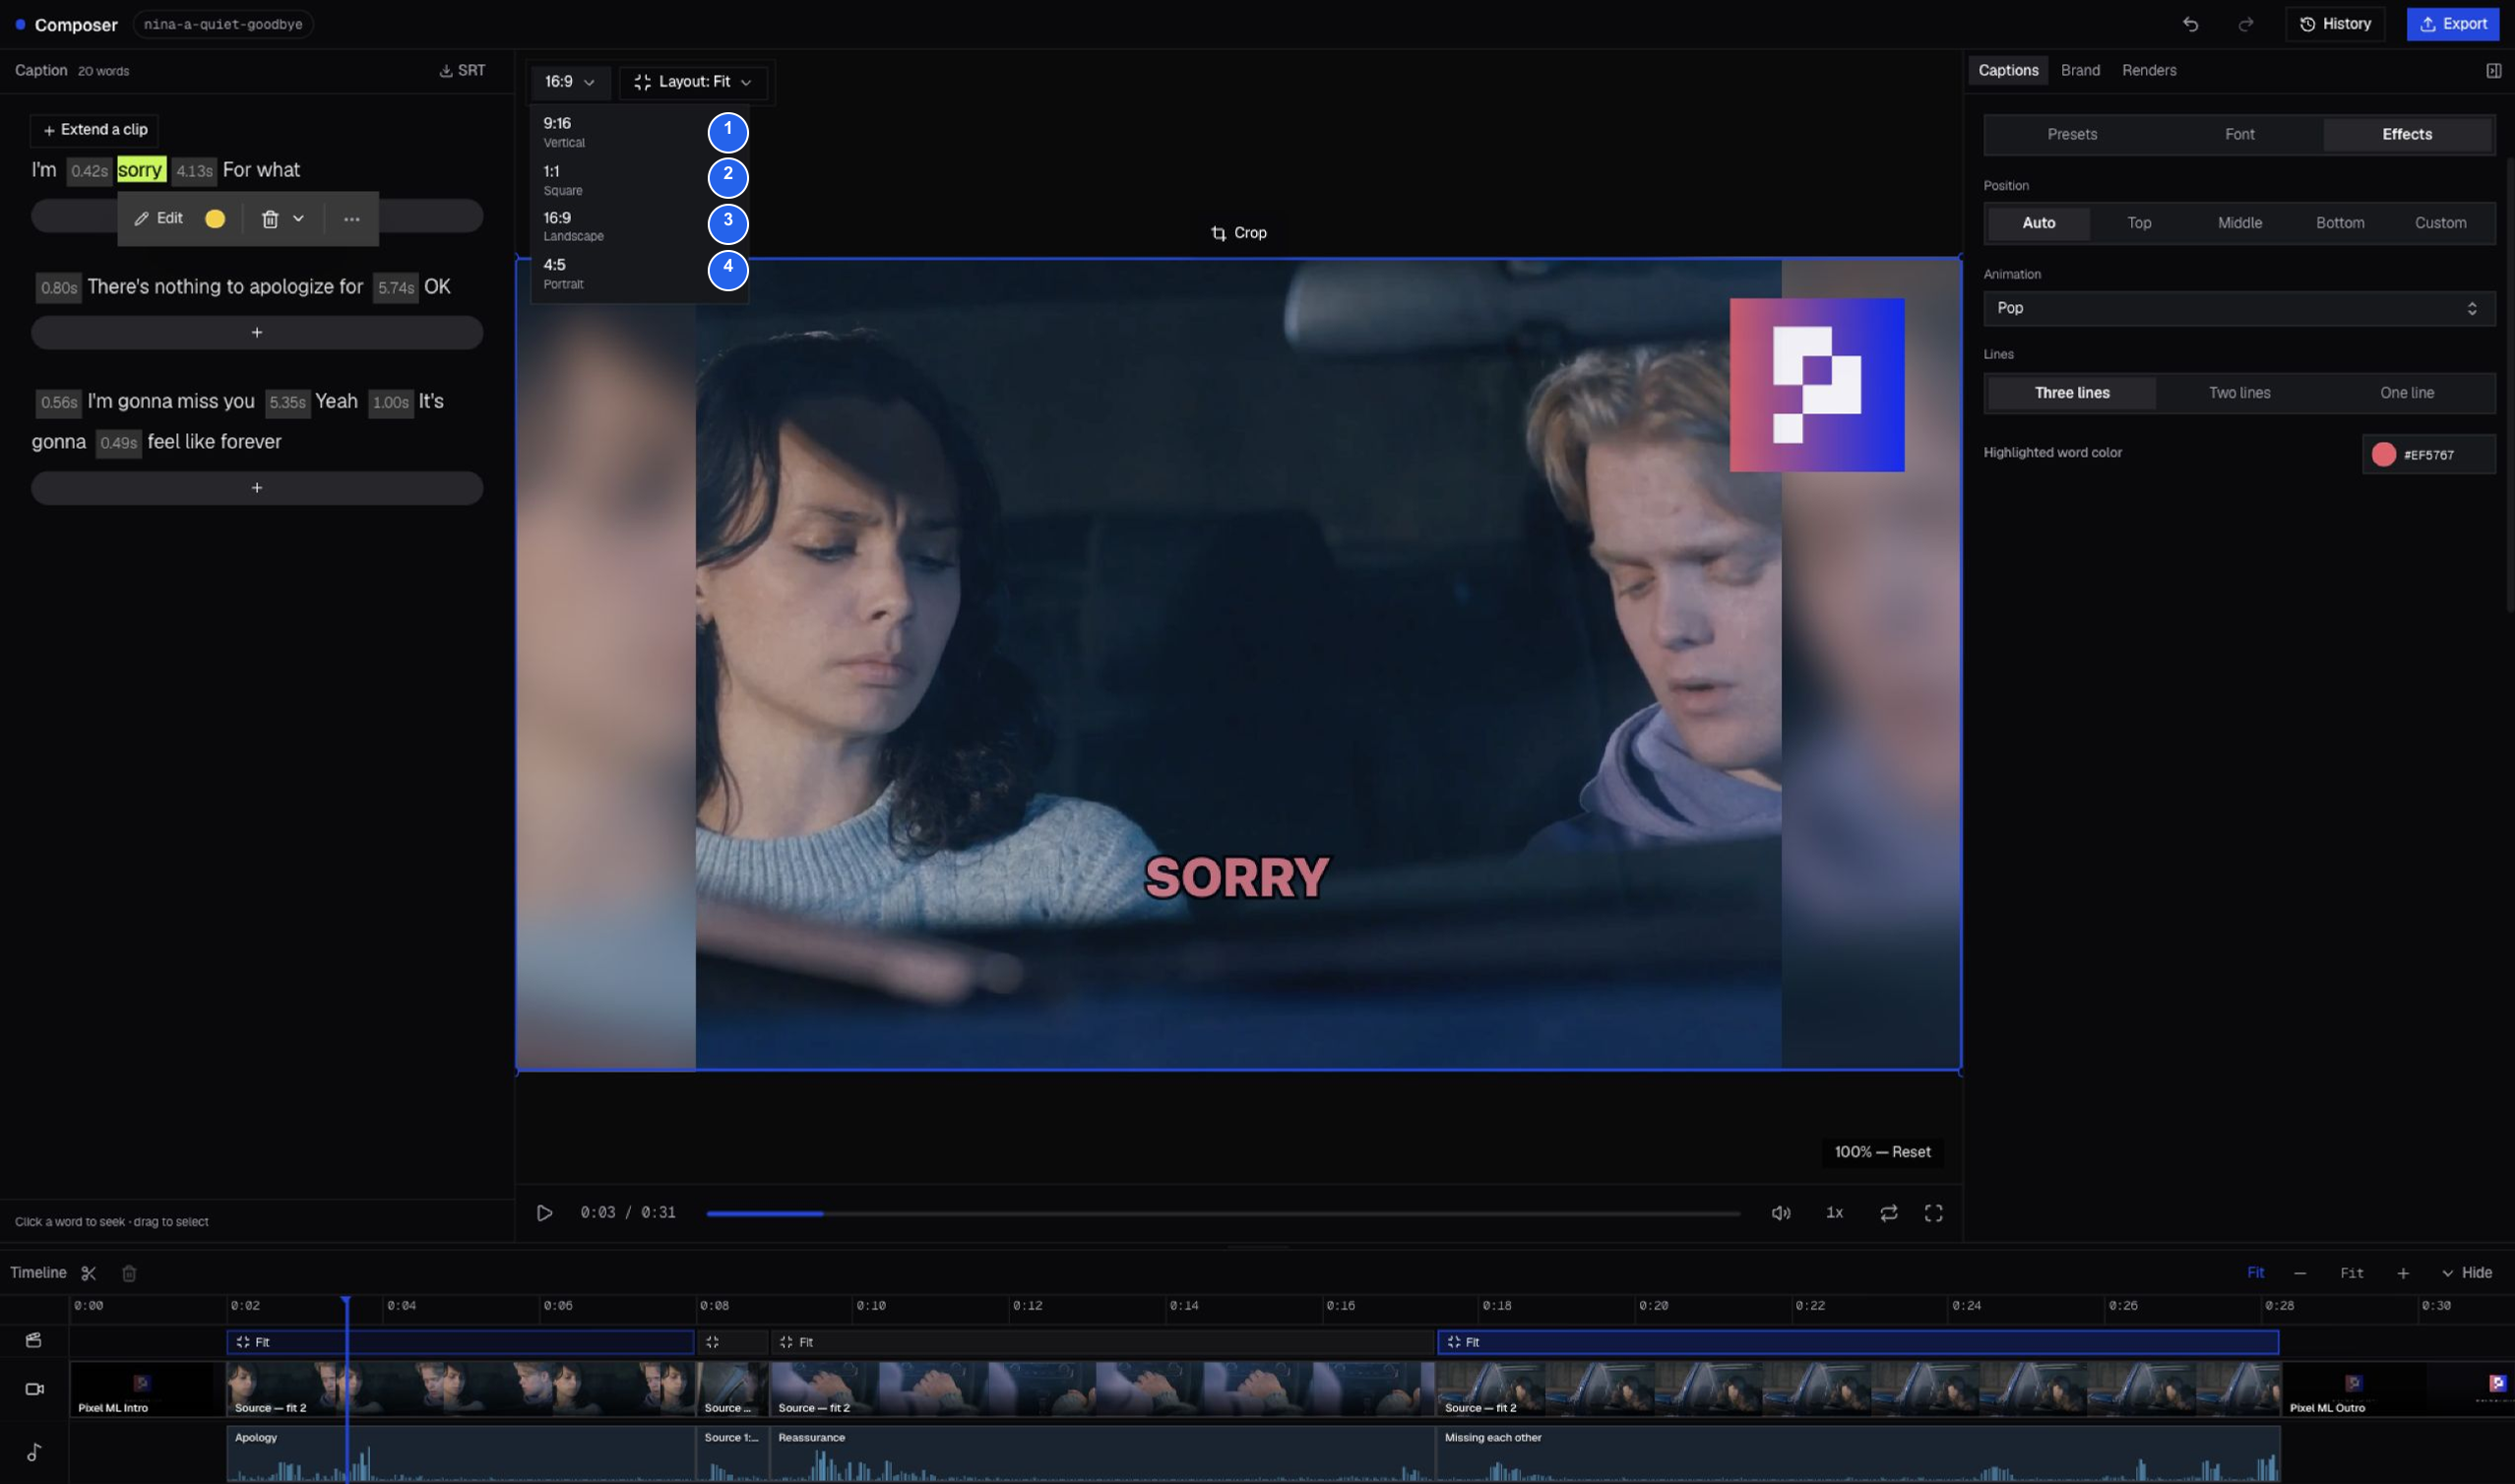
| # | Aspect | Common use |
|---|---|---|
| 1 | 9:16 Vertical | Shorts, Reels, and TikTok-style feeds. |
| 2 | 1:1 Square | Square social posts and embedded cards. |
| 3 | 16:9 Landscape | Web players, presentations, and standard video platforms. |
| 4 | 4:5 Portrait | Portrait feed posts with more horizontal room than 9:16. |
Changing aspect can expose empty space or crop a subject. Review every scene after switching ratios; do not assume one crop works across all formats.
Set a scene layout
Layout controls how source footage is arranged inside the chosen aspect ratio. Select the scene in the timeline, then open Layout.
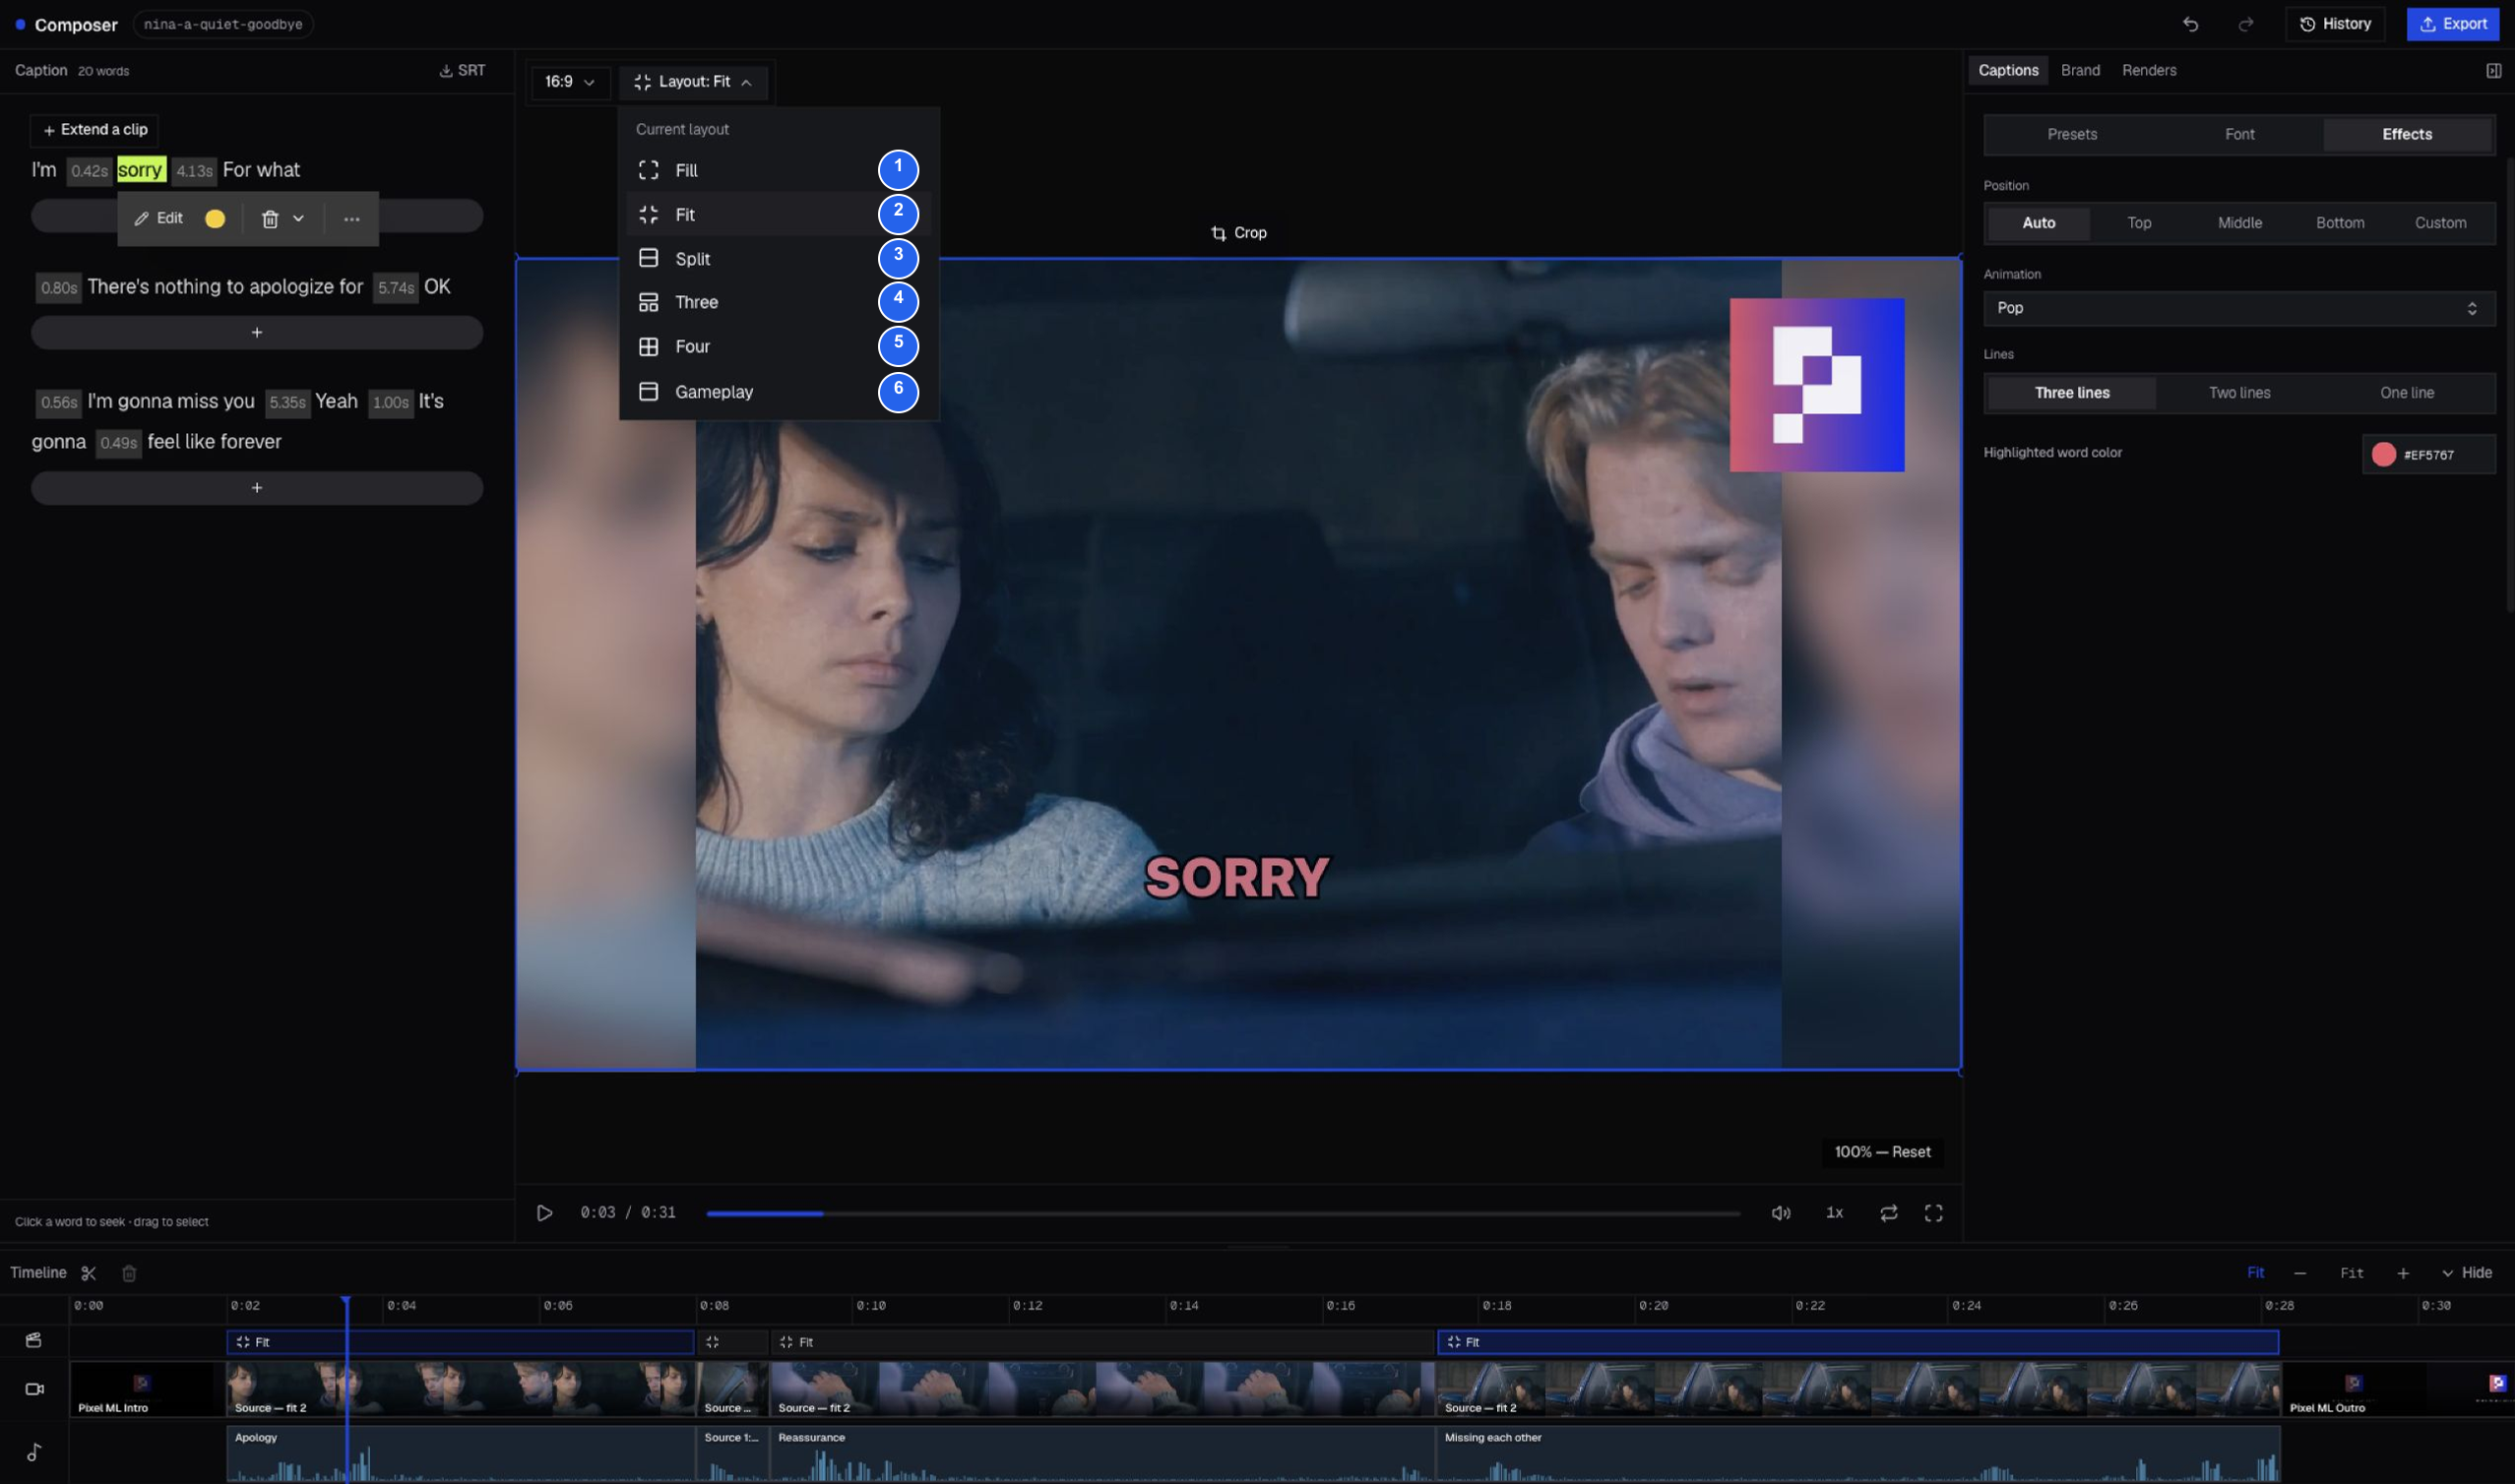
| # | Layout | Result |
|---|---|---|
| 1 | Fill | Fills the canvas; some edges may be cropped. |
| 2 | Fit | Keeps the source proportions inside the canvas. In this Nina example, a full 4:3 foreground picture is surrounded by blurred side fill. |
| 3 | Split | Places two visual regions in a split frame. |
| 4 | Three | Creates a three-region composition. |
| 5 | Four | Creates a four-region composition. |
| 6 | Gameplay | Uses a stacked layout suited to a primary view plus supporting footage. |
Multi-region layouts are most useful when a scene already has enough visual sources. If a layout produces an empty region, return to Fill or Fit, or add the missing media before delivery.
Refine the crop
Use Crop to adjust the visible part of the selected video. The dialog below is opened on a Fit scene; it was inspected and closed without applying a crop, so the tutorial keeps Nina’s full original 4:3 picture.
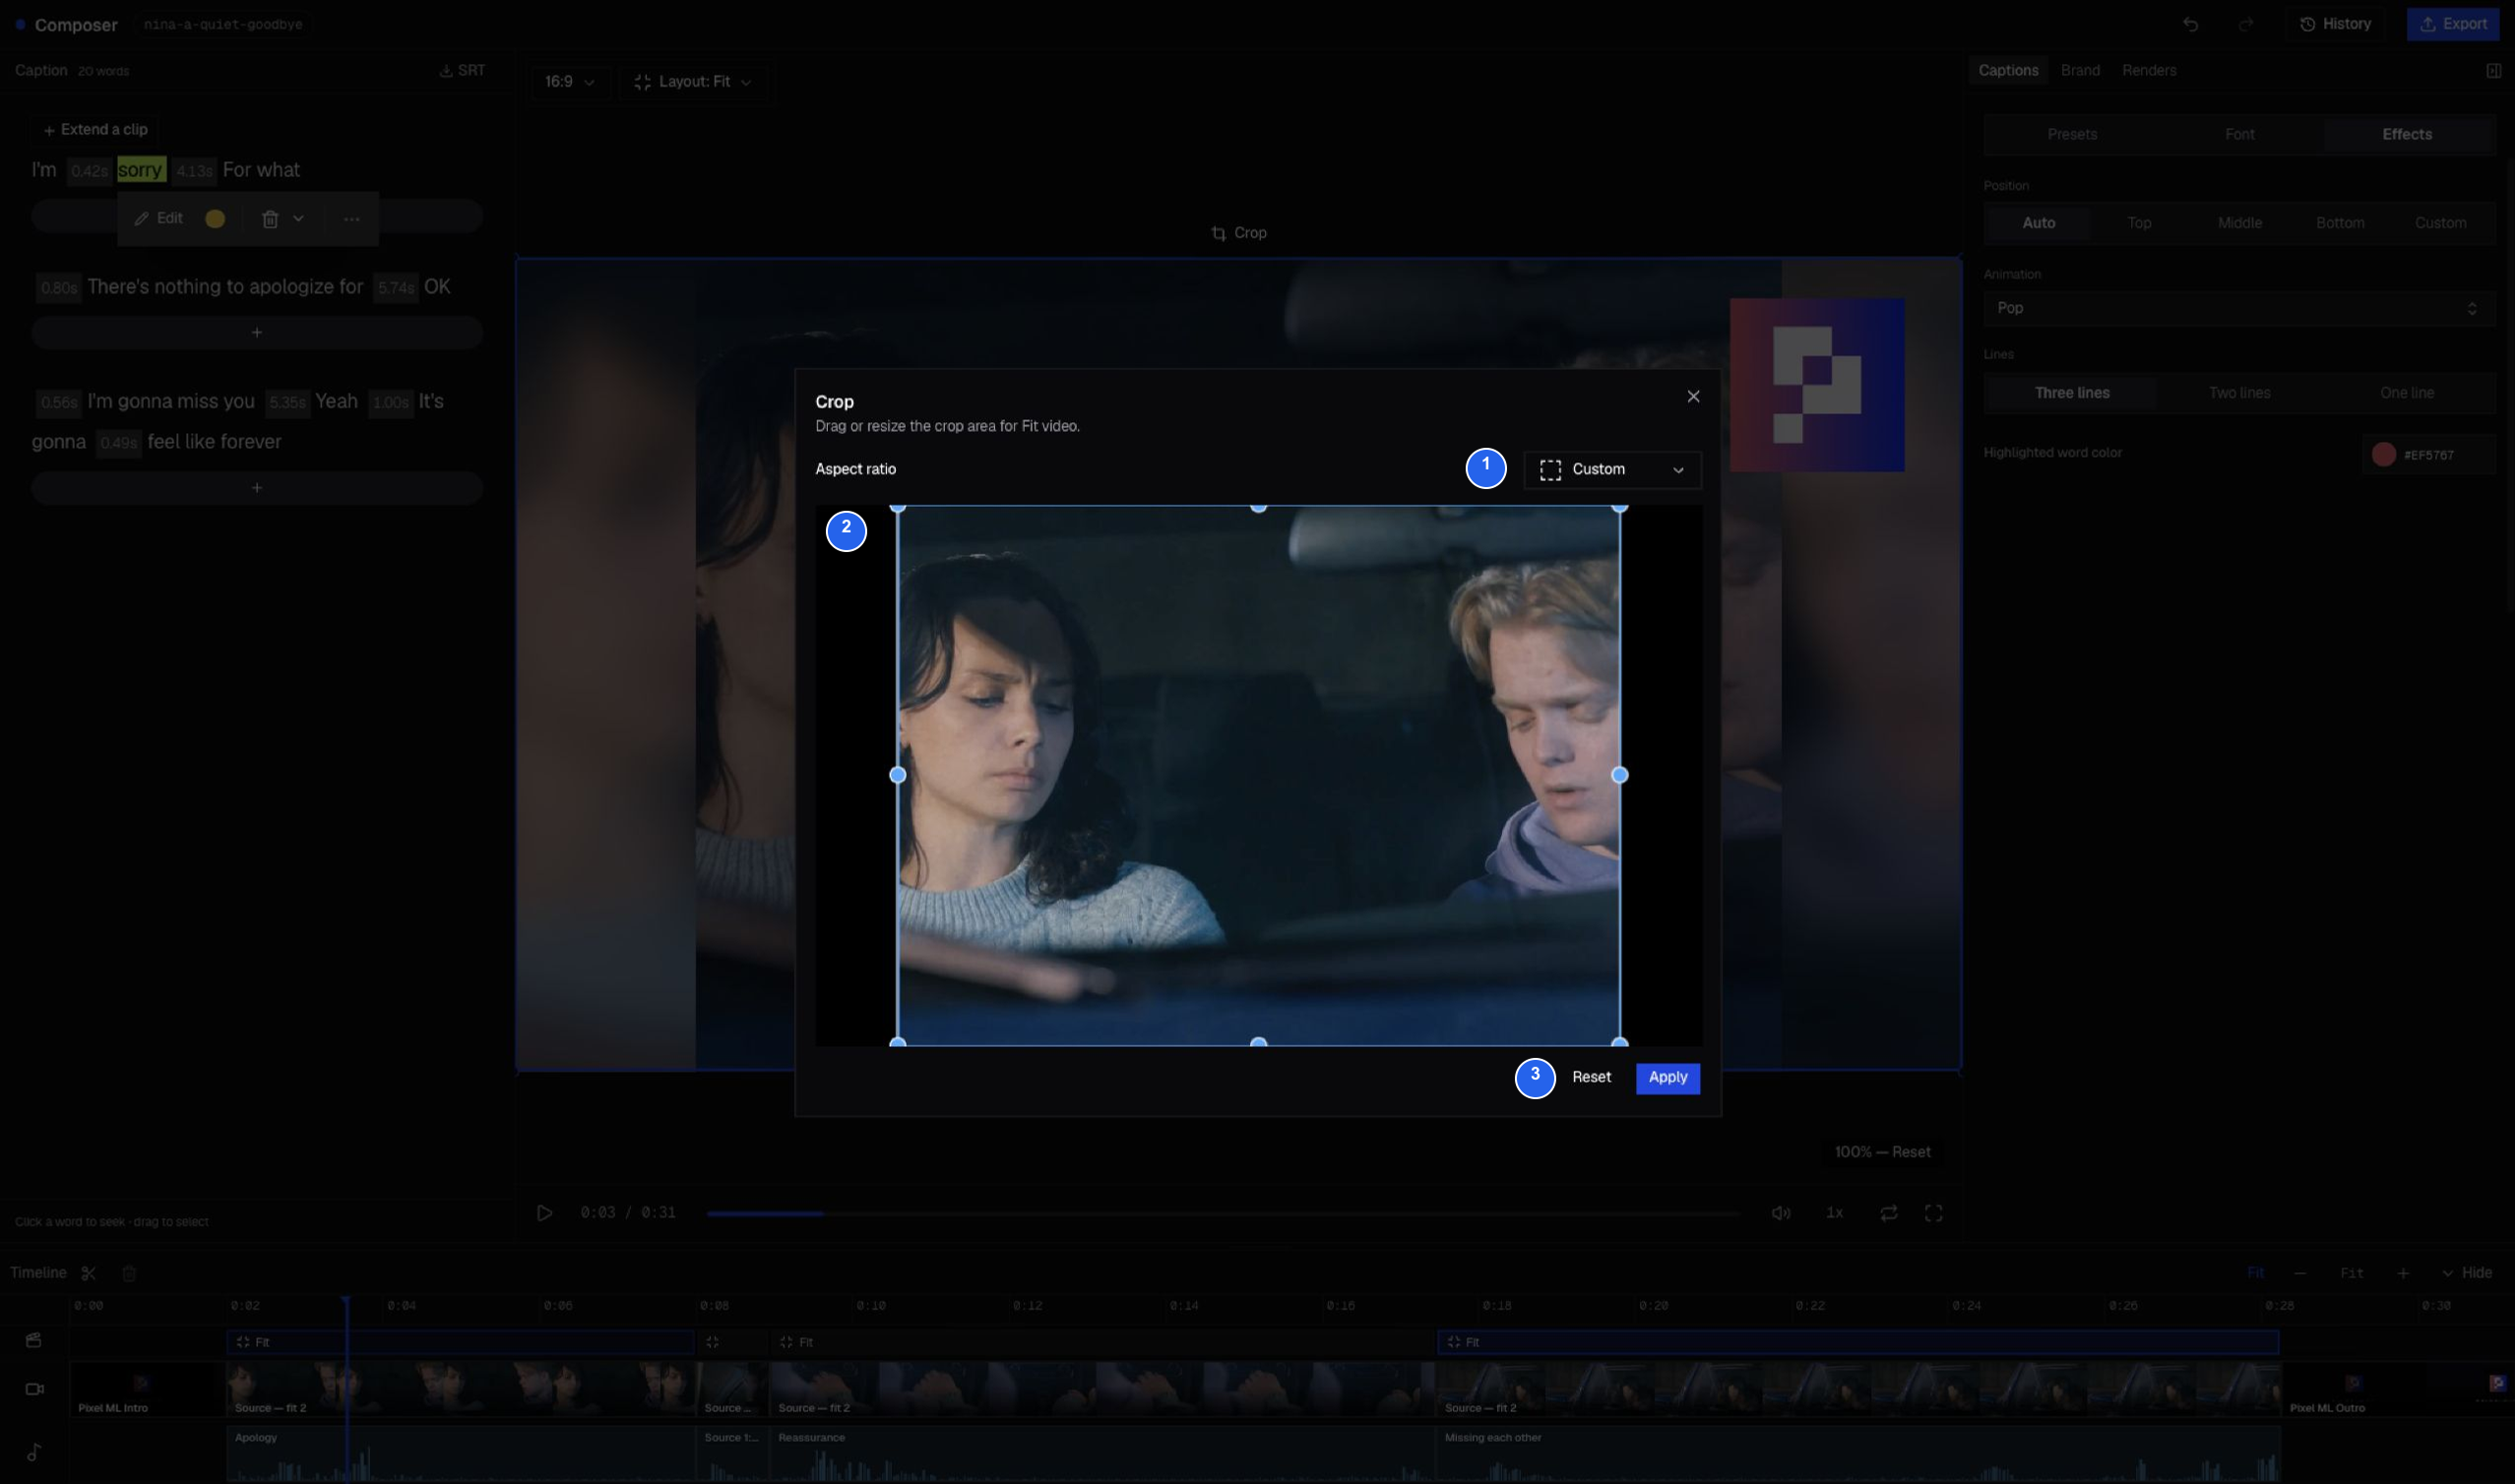
| # | Control | What to do |
|---|---|---|
| 1 | Aspect ratio | Keep Custom for a free crop or choose a constrained shape. |
| 2 | Crop area | Drag the box to reframe; drag its handles to resize it. |
| 3 | Reset / Apply | Reset removes the adjustment; Apply saves the new framing. |
Check the first and last frames of the scene after applying a crop. A subject that is centered at the start may move out of frame later.
Style captions
The Captions tab has three levels of control:
- Presets applies a complete starting style.
- Font adjusts typography and readability.
- Effects controls placement, animation, line count, and word highlighting.
Font and readability
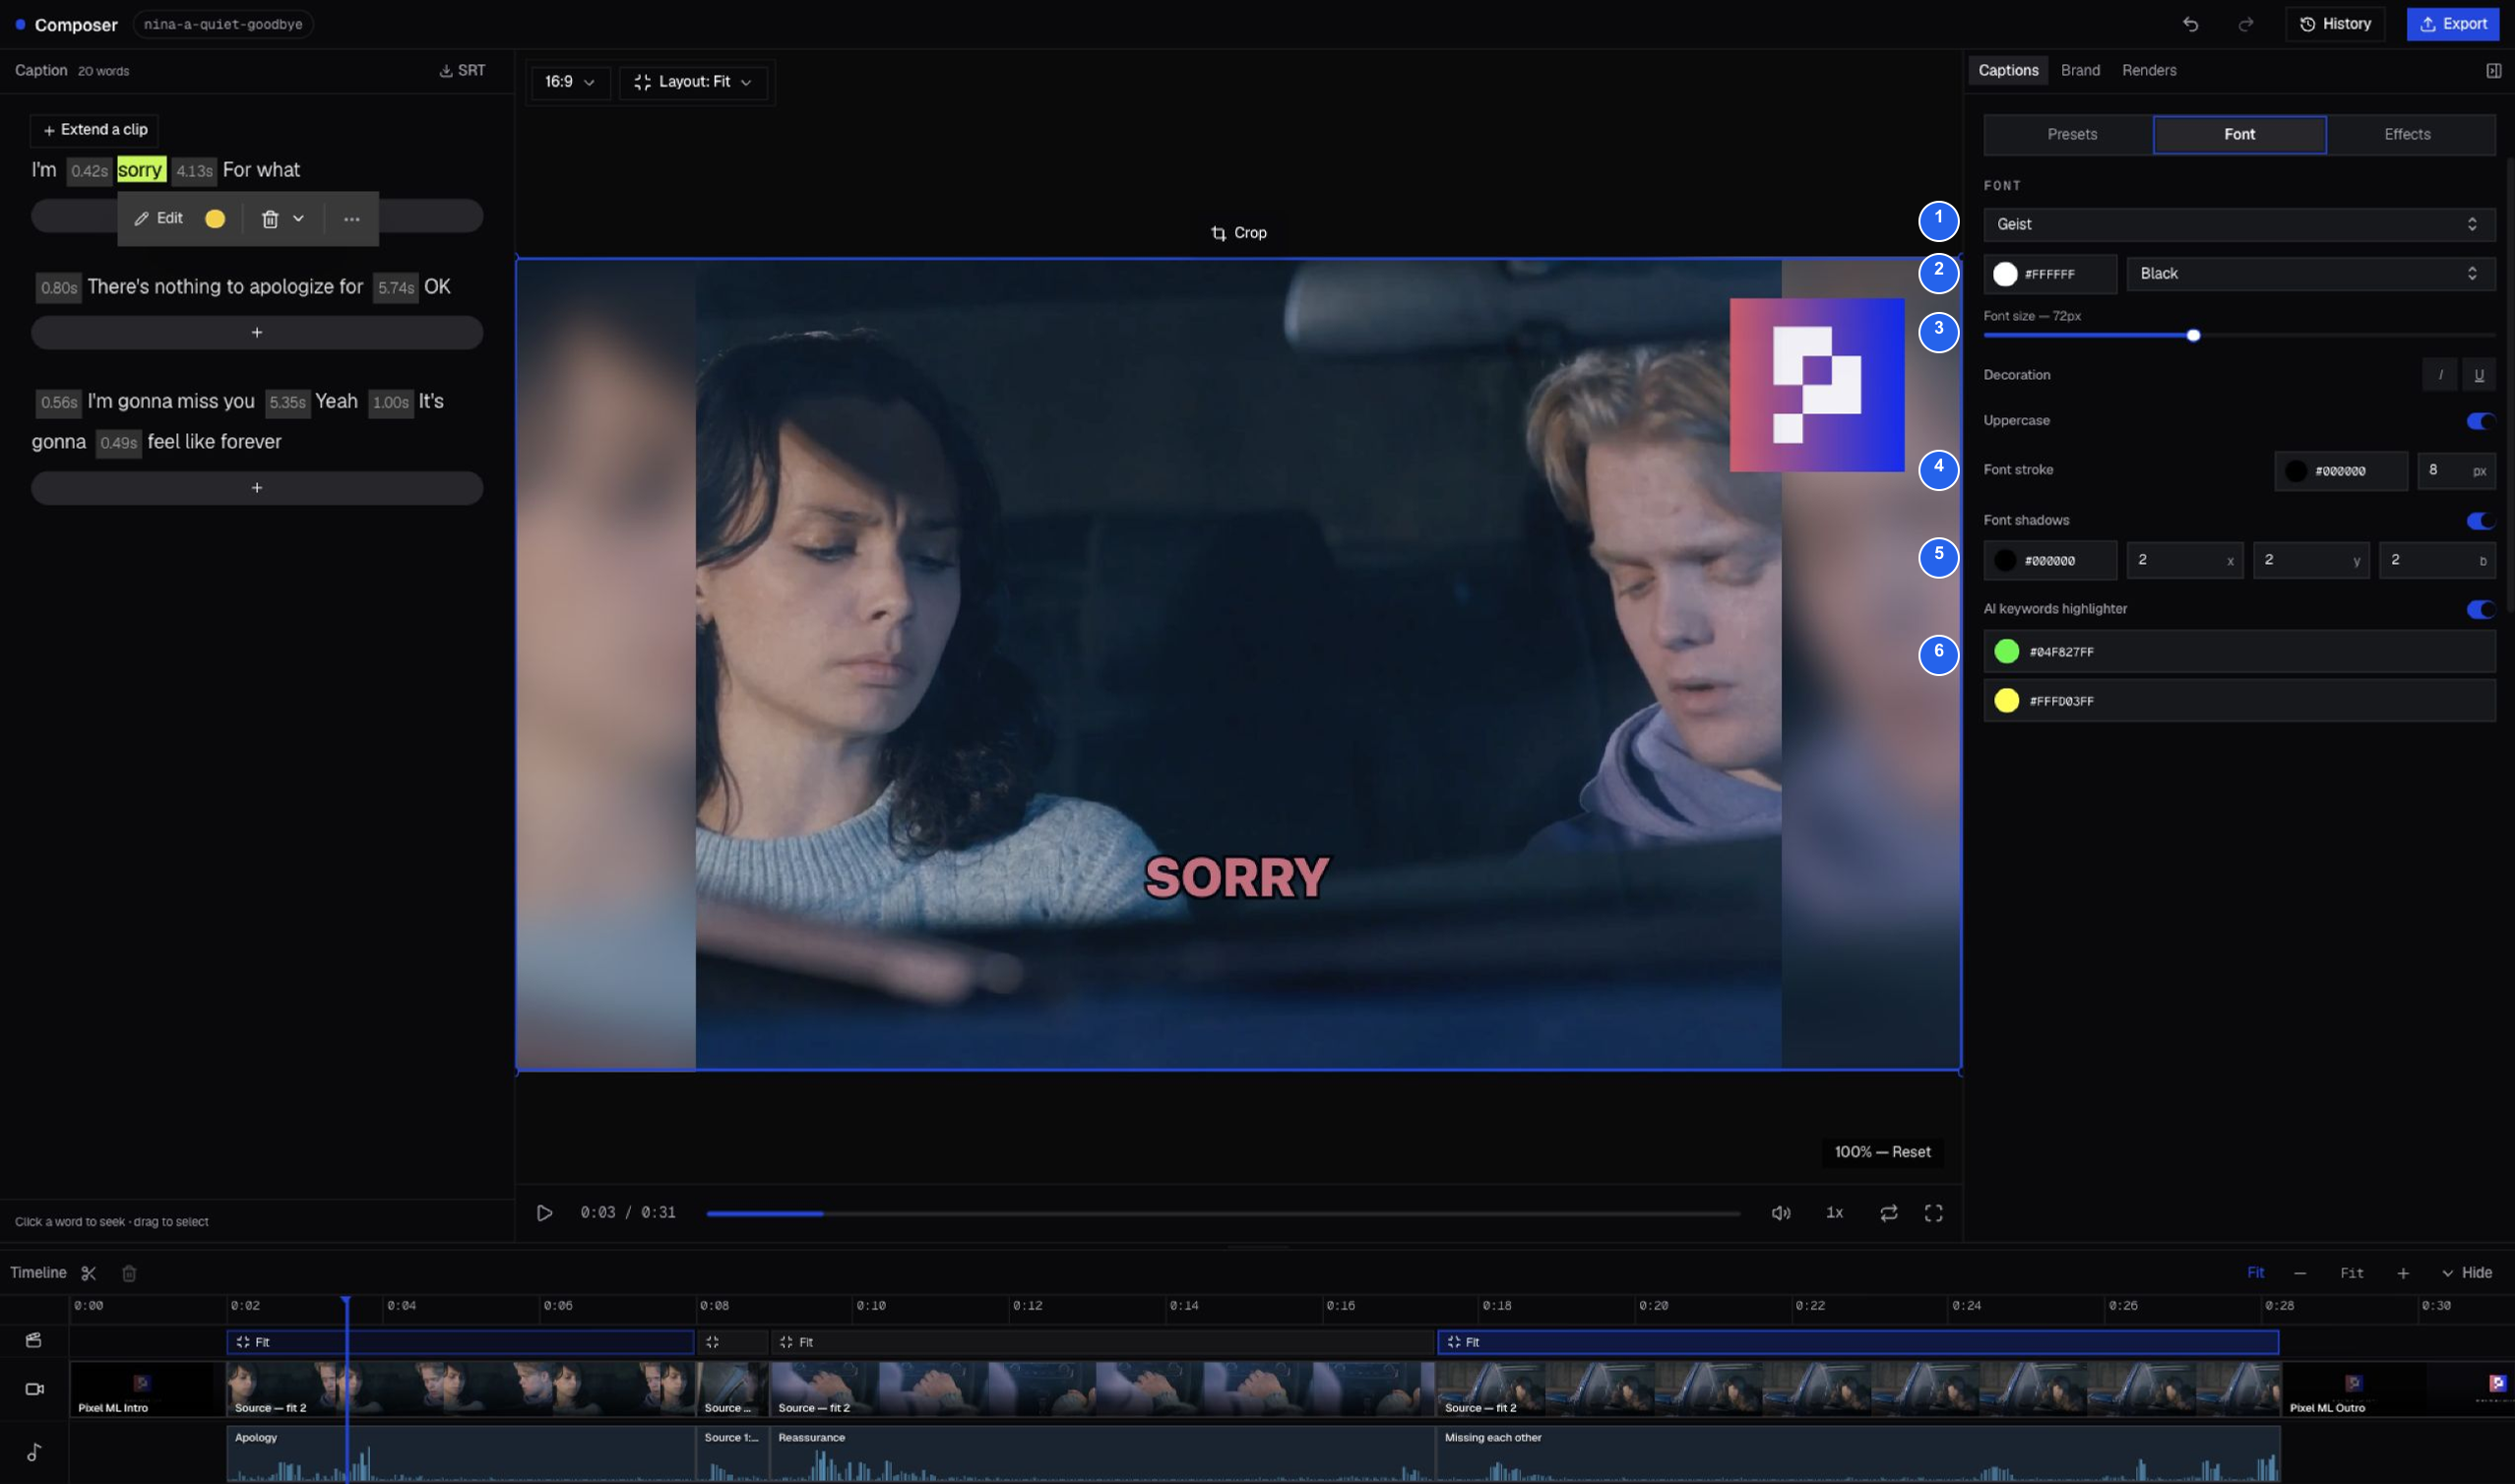
| # | Setting | What it changes |
|---|---|---|
| 1 | Font family | The typeface used for all captions. |
| 2 | Color and weight | Text color and weight, such as Regular, Bold, or Black. |
| 3 | Size and decoration | Caption scale plus italic, underline, and uppercase treatment. |
| 4 | Stroke | Outline color and width for contrast against footage. |
| 5 | Shadow | Shadow color, position, and blur. |
| 6 | AI keyword highlighter | Enables keyword emphasis and sets the available highlight colors. |
Use the preview, not the settings panel alone, to judge readability. Test both a bright and a dark shot; stroke and shadow should keep the words legible without overpowering the footage.
Position and motion
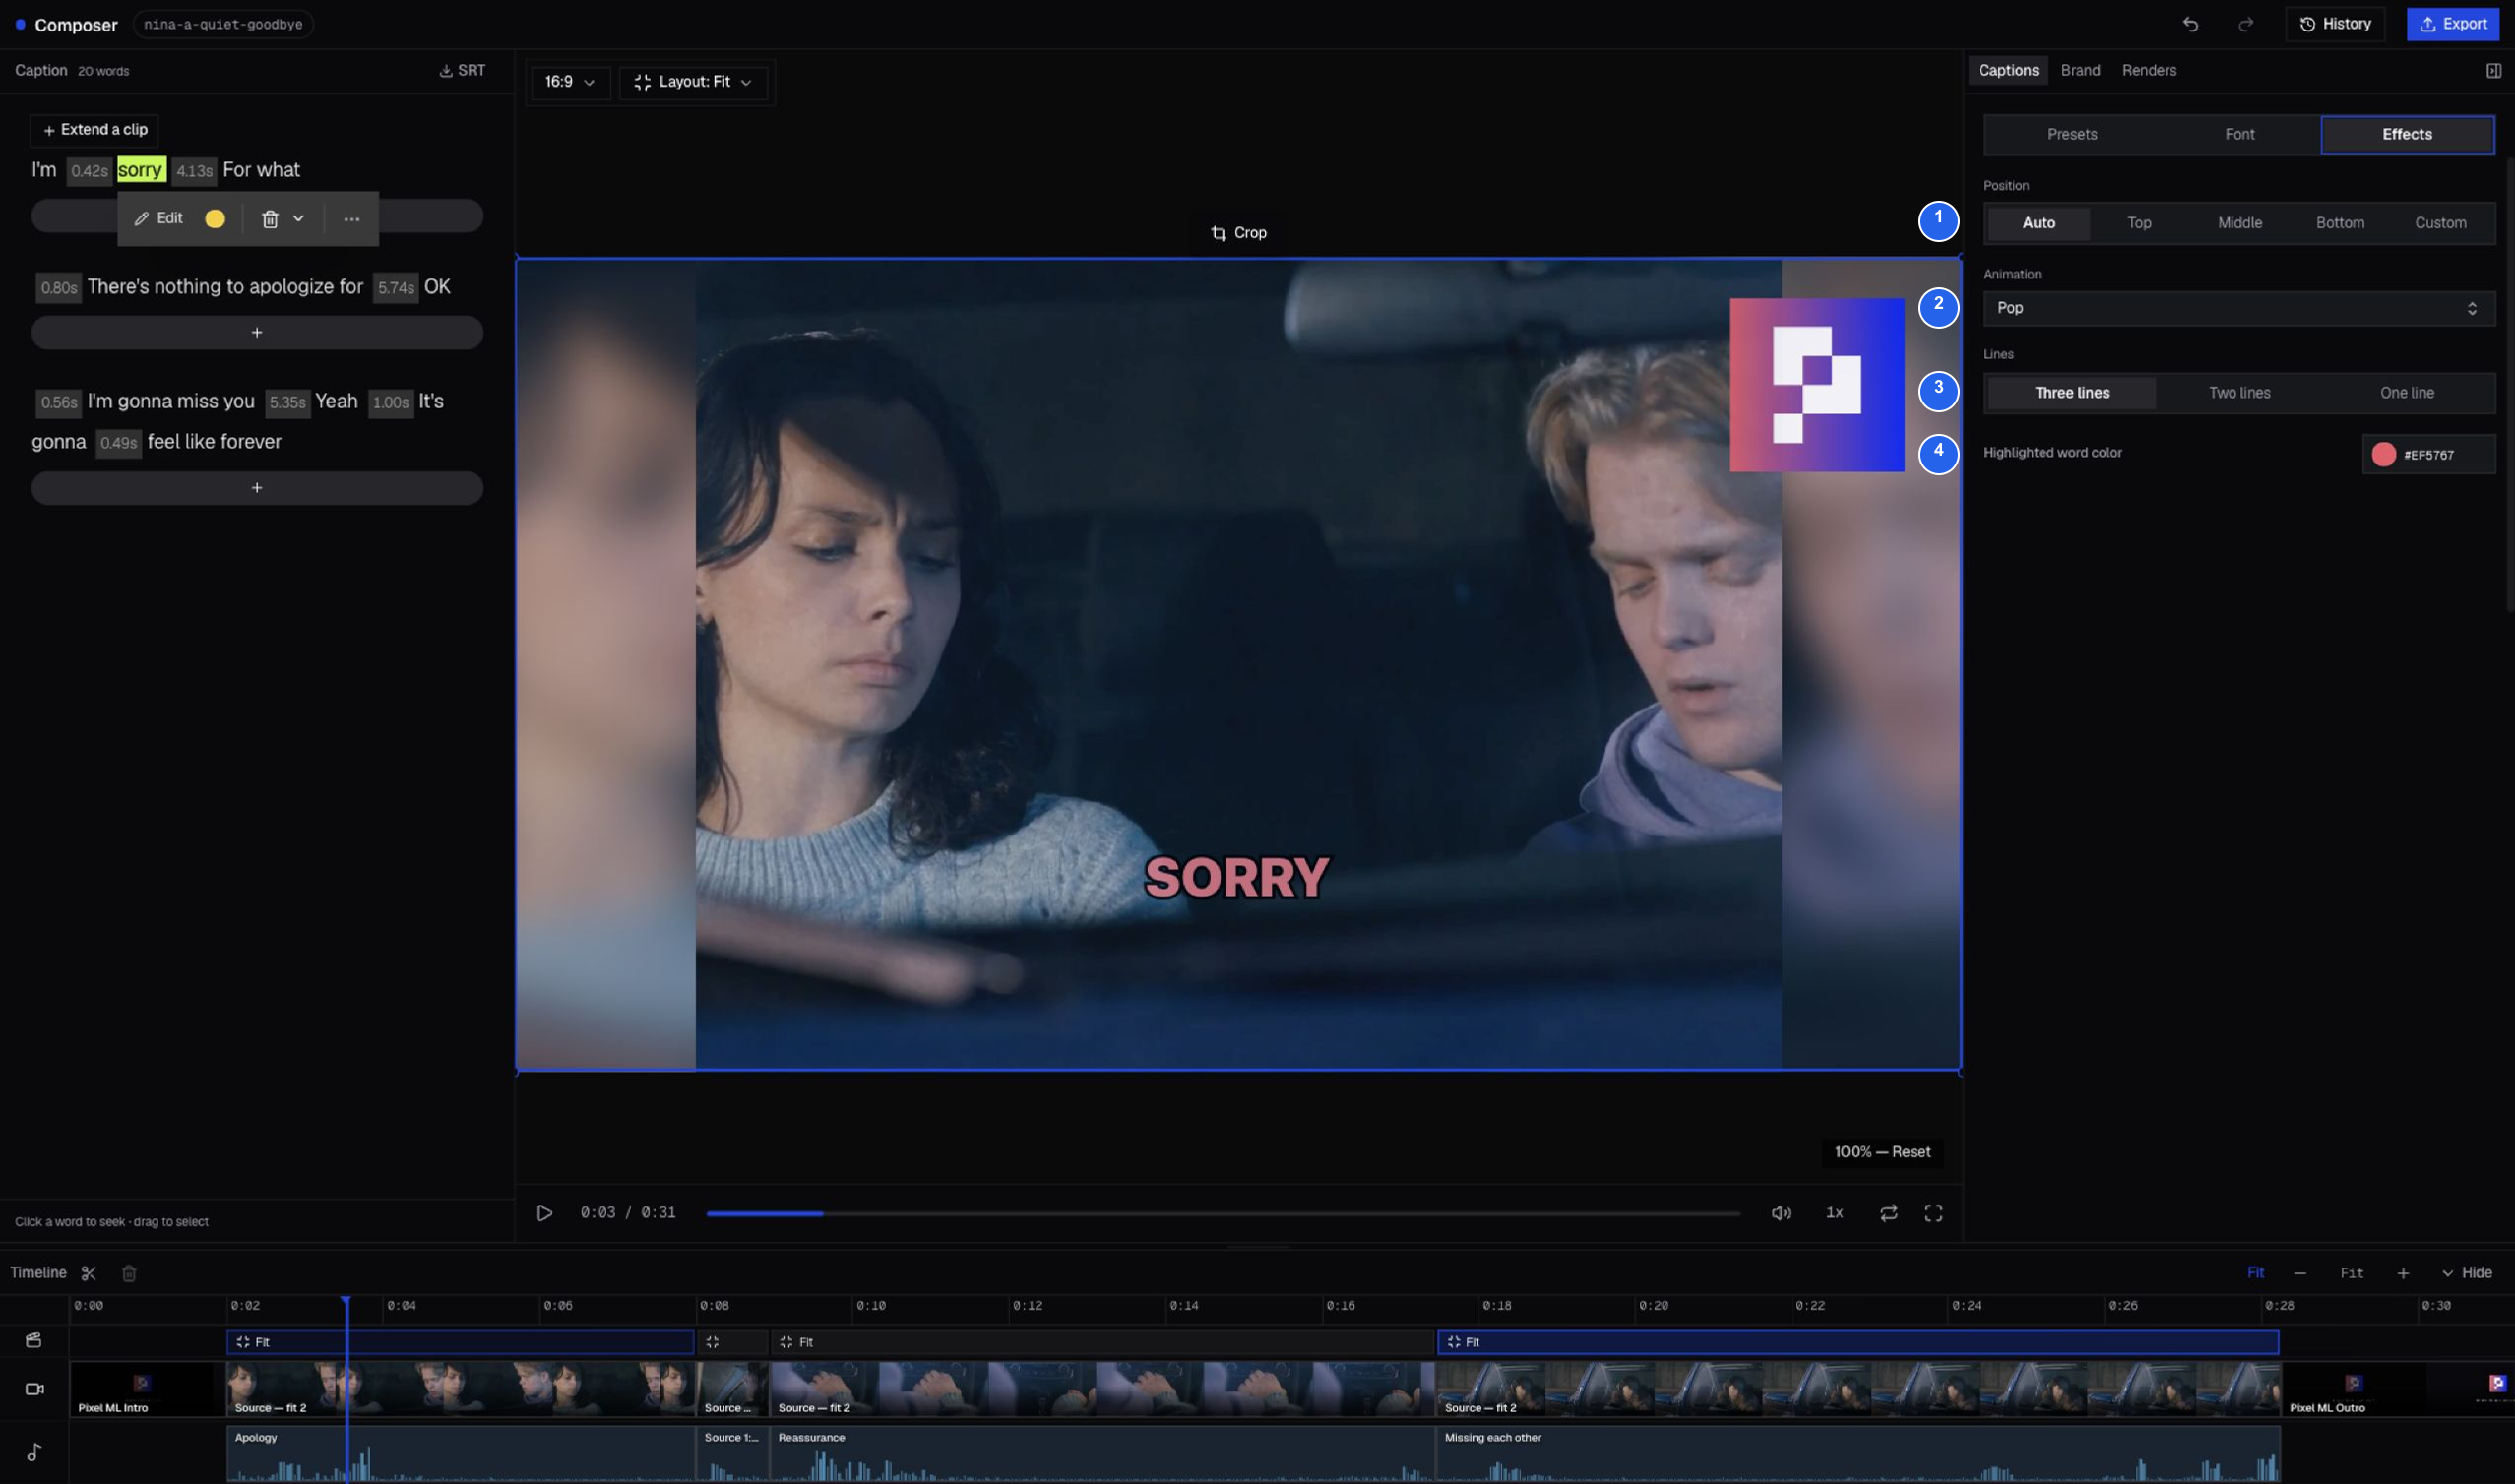
| # | Setting | Options and behavior |
|---|---|---|
| 1 | Position | Auto, Top, Middle, Bottom, or Custom placement. |
| 2 | Animation | Chooses how caption words enter and update. |
| 3 | Lines | Limits captions to three, two, or one line. |
| 4 | Highlighted word color | Sets the active-word color used during playback. |
For vertical video, check that captions do not collide with faces or platform controls. A shorter line count is easier to scan but updates more frequently.
Apply a Brand Template
Brand Templates package repeatable visual decisions—aspect ratio, layout, caption styling, logo placement, and optional intro or outro media—into one reusable choice.
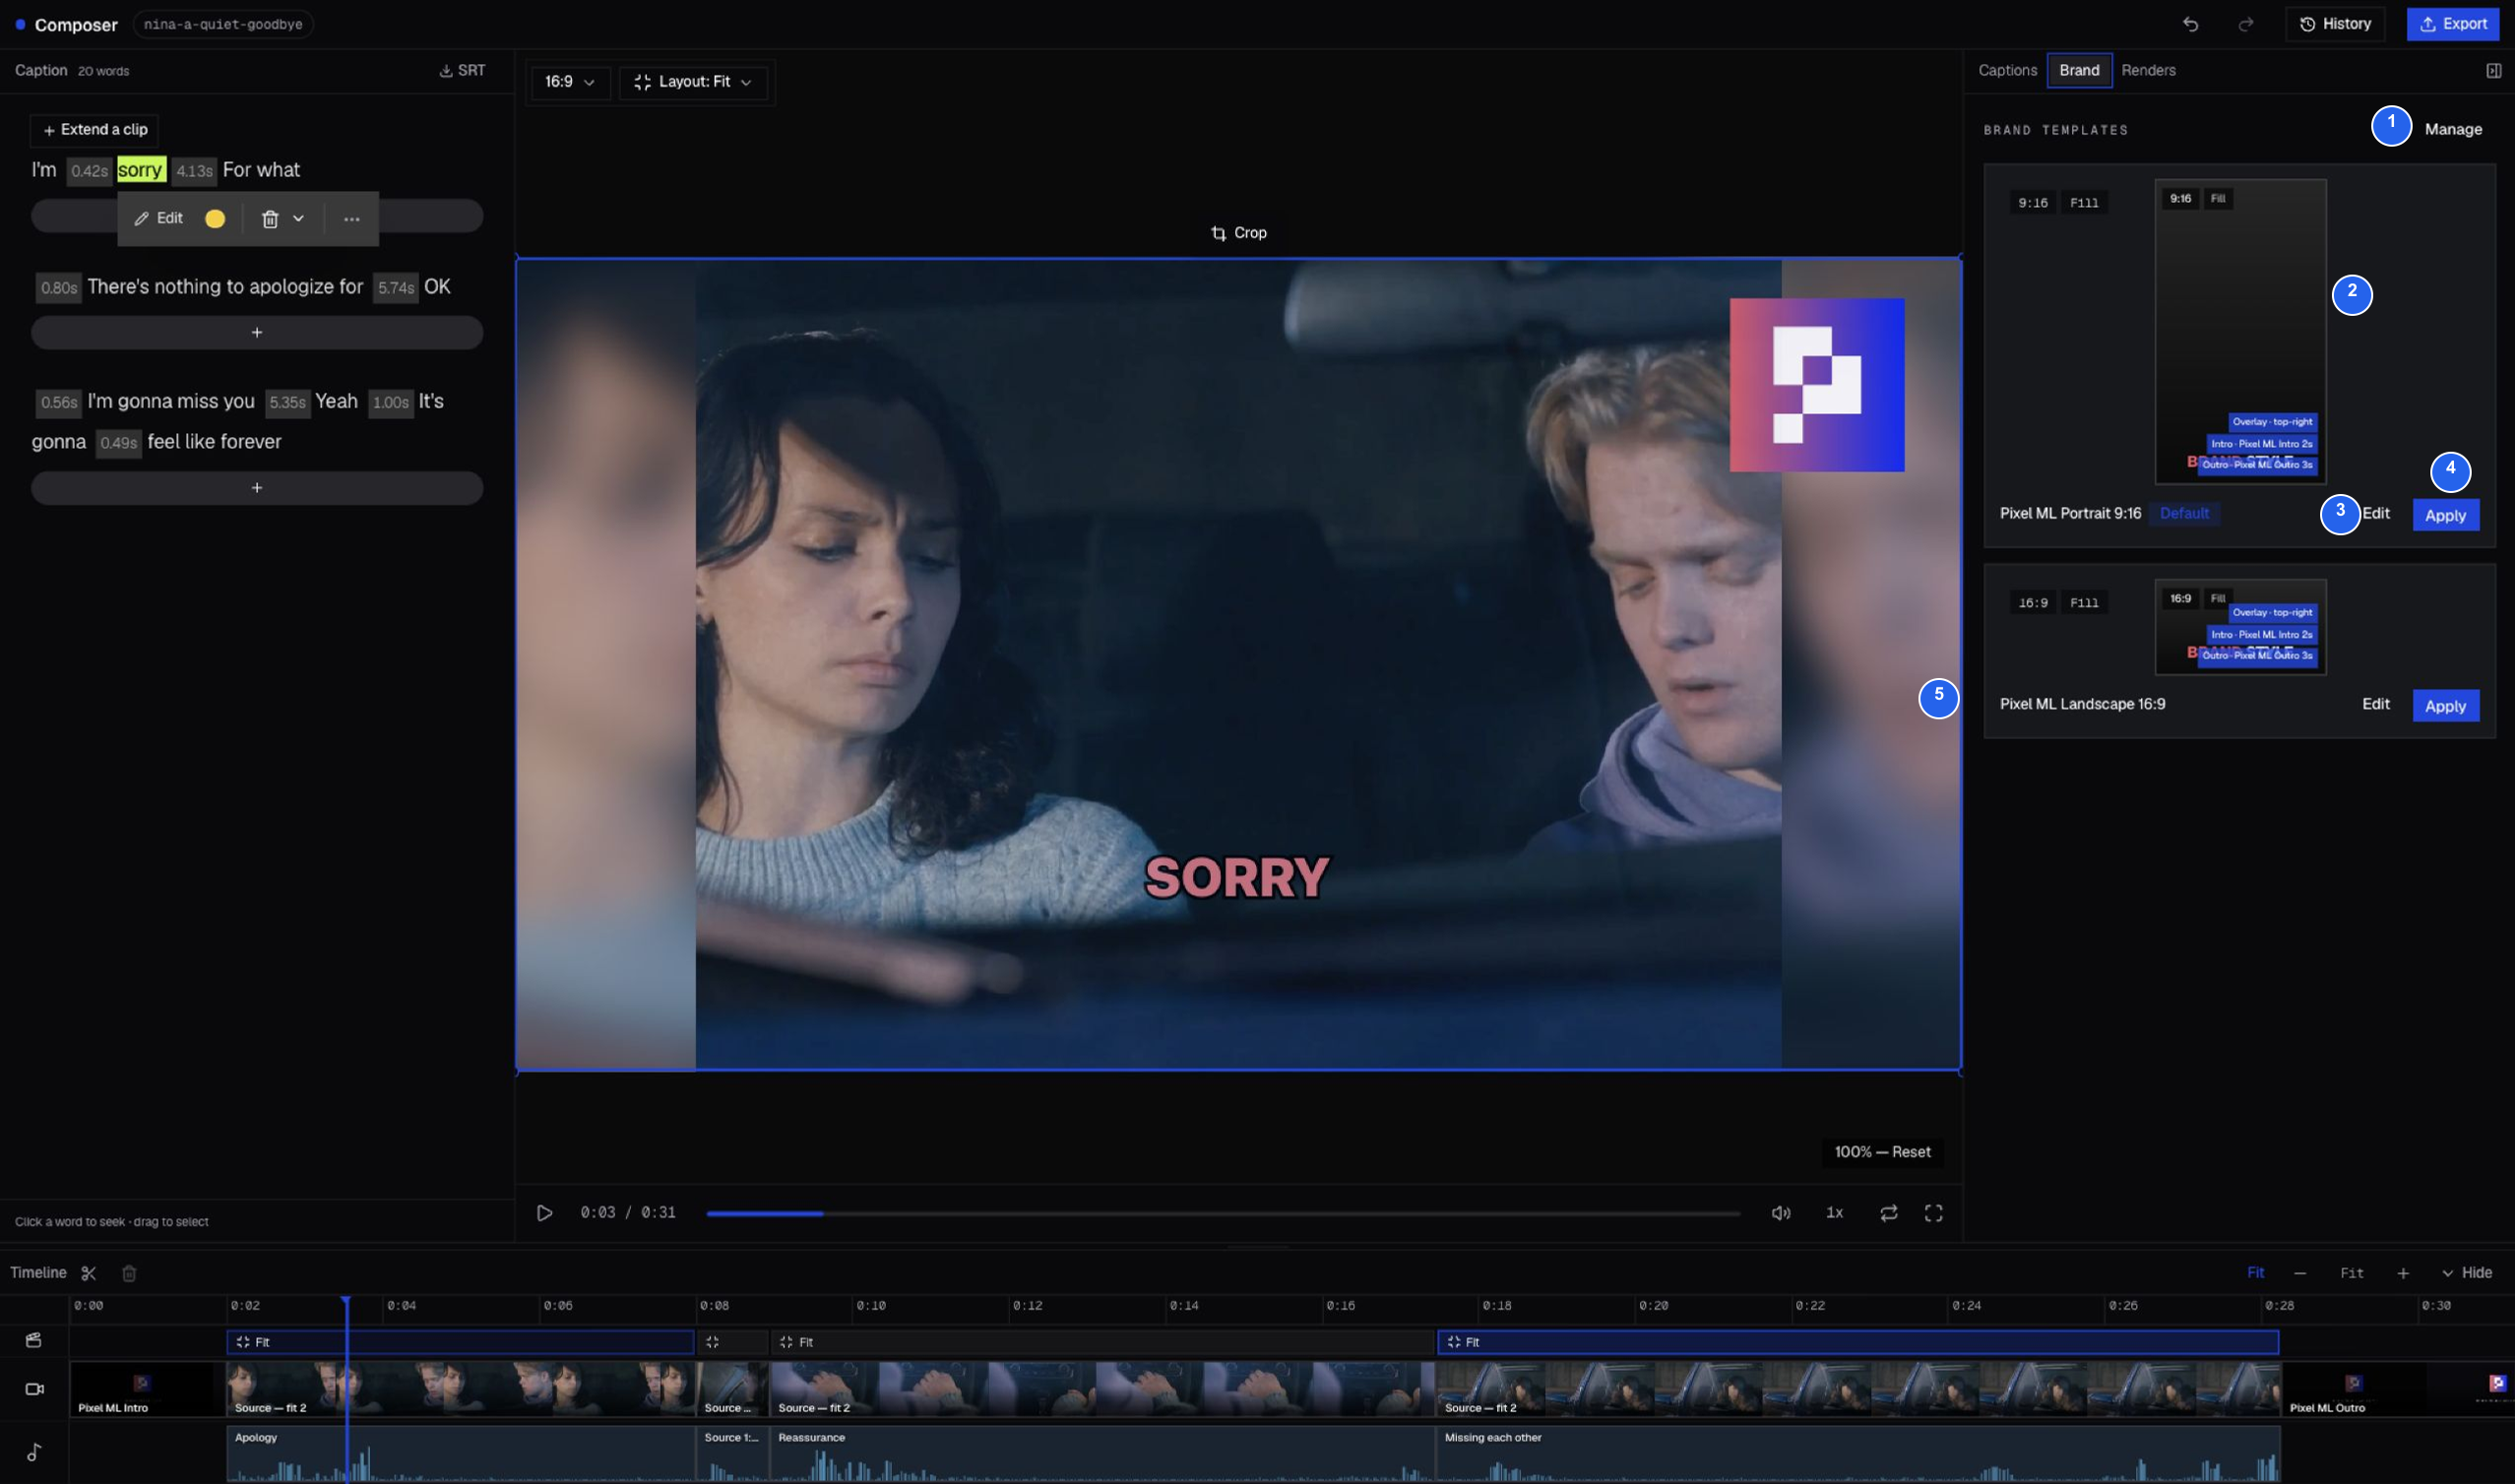
| # | Control | What it does |
|---|---|---|
| 1 | Manage | Opens the Brand Templates library to create and maintain templates. |
| 2 | Template preview | Shows the template’s aspect, layout, overlay, intro, and outro treatment before use. |
| 3 | Edit | Opens the selected template’s settings. |
| 4 | Apply | Applies that template to the current project. |
| 5 | Landscape template | The 16:9 variant used for this example. The Portrait variant is marked Default in the captured library; default and currently chosen output are not the same thing. |
Applying a template is a project edit, not just a preview filter. Wait for clip caching, then check the opening, one middle scene, and the ending. Confirm the logo remains inside safe areas and that any intro or outro matches the project aspect ratio.
This example keeps the Pixel ML Landscape 16:9 template selected during Produce, including the supplied Pixel ML intro, outro, and logo. The source film remains separately credited. The four body scenes were changed from Fill to Fit in Studio; applying a template again may change scene styling, so review framing afterward.
Use History, Undo, and Redo
Studio records accepted edits as revisions. The header arrows handle the most recent undo or redo; History is safer when you need to identify a specific earlier state.
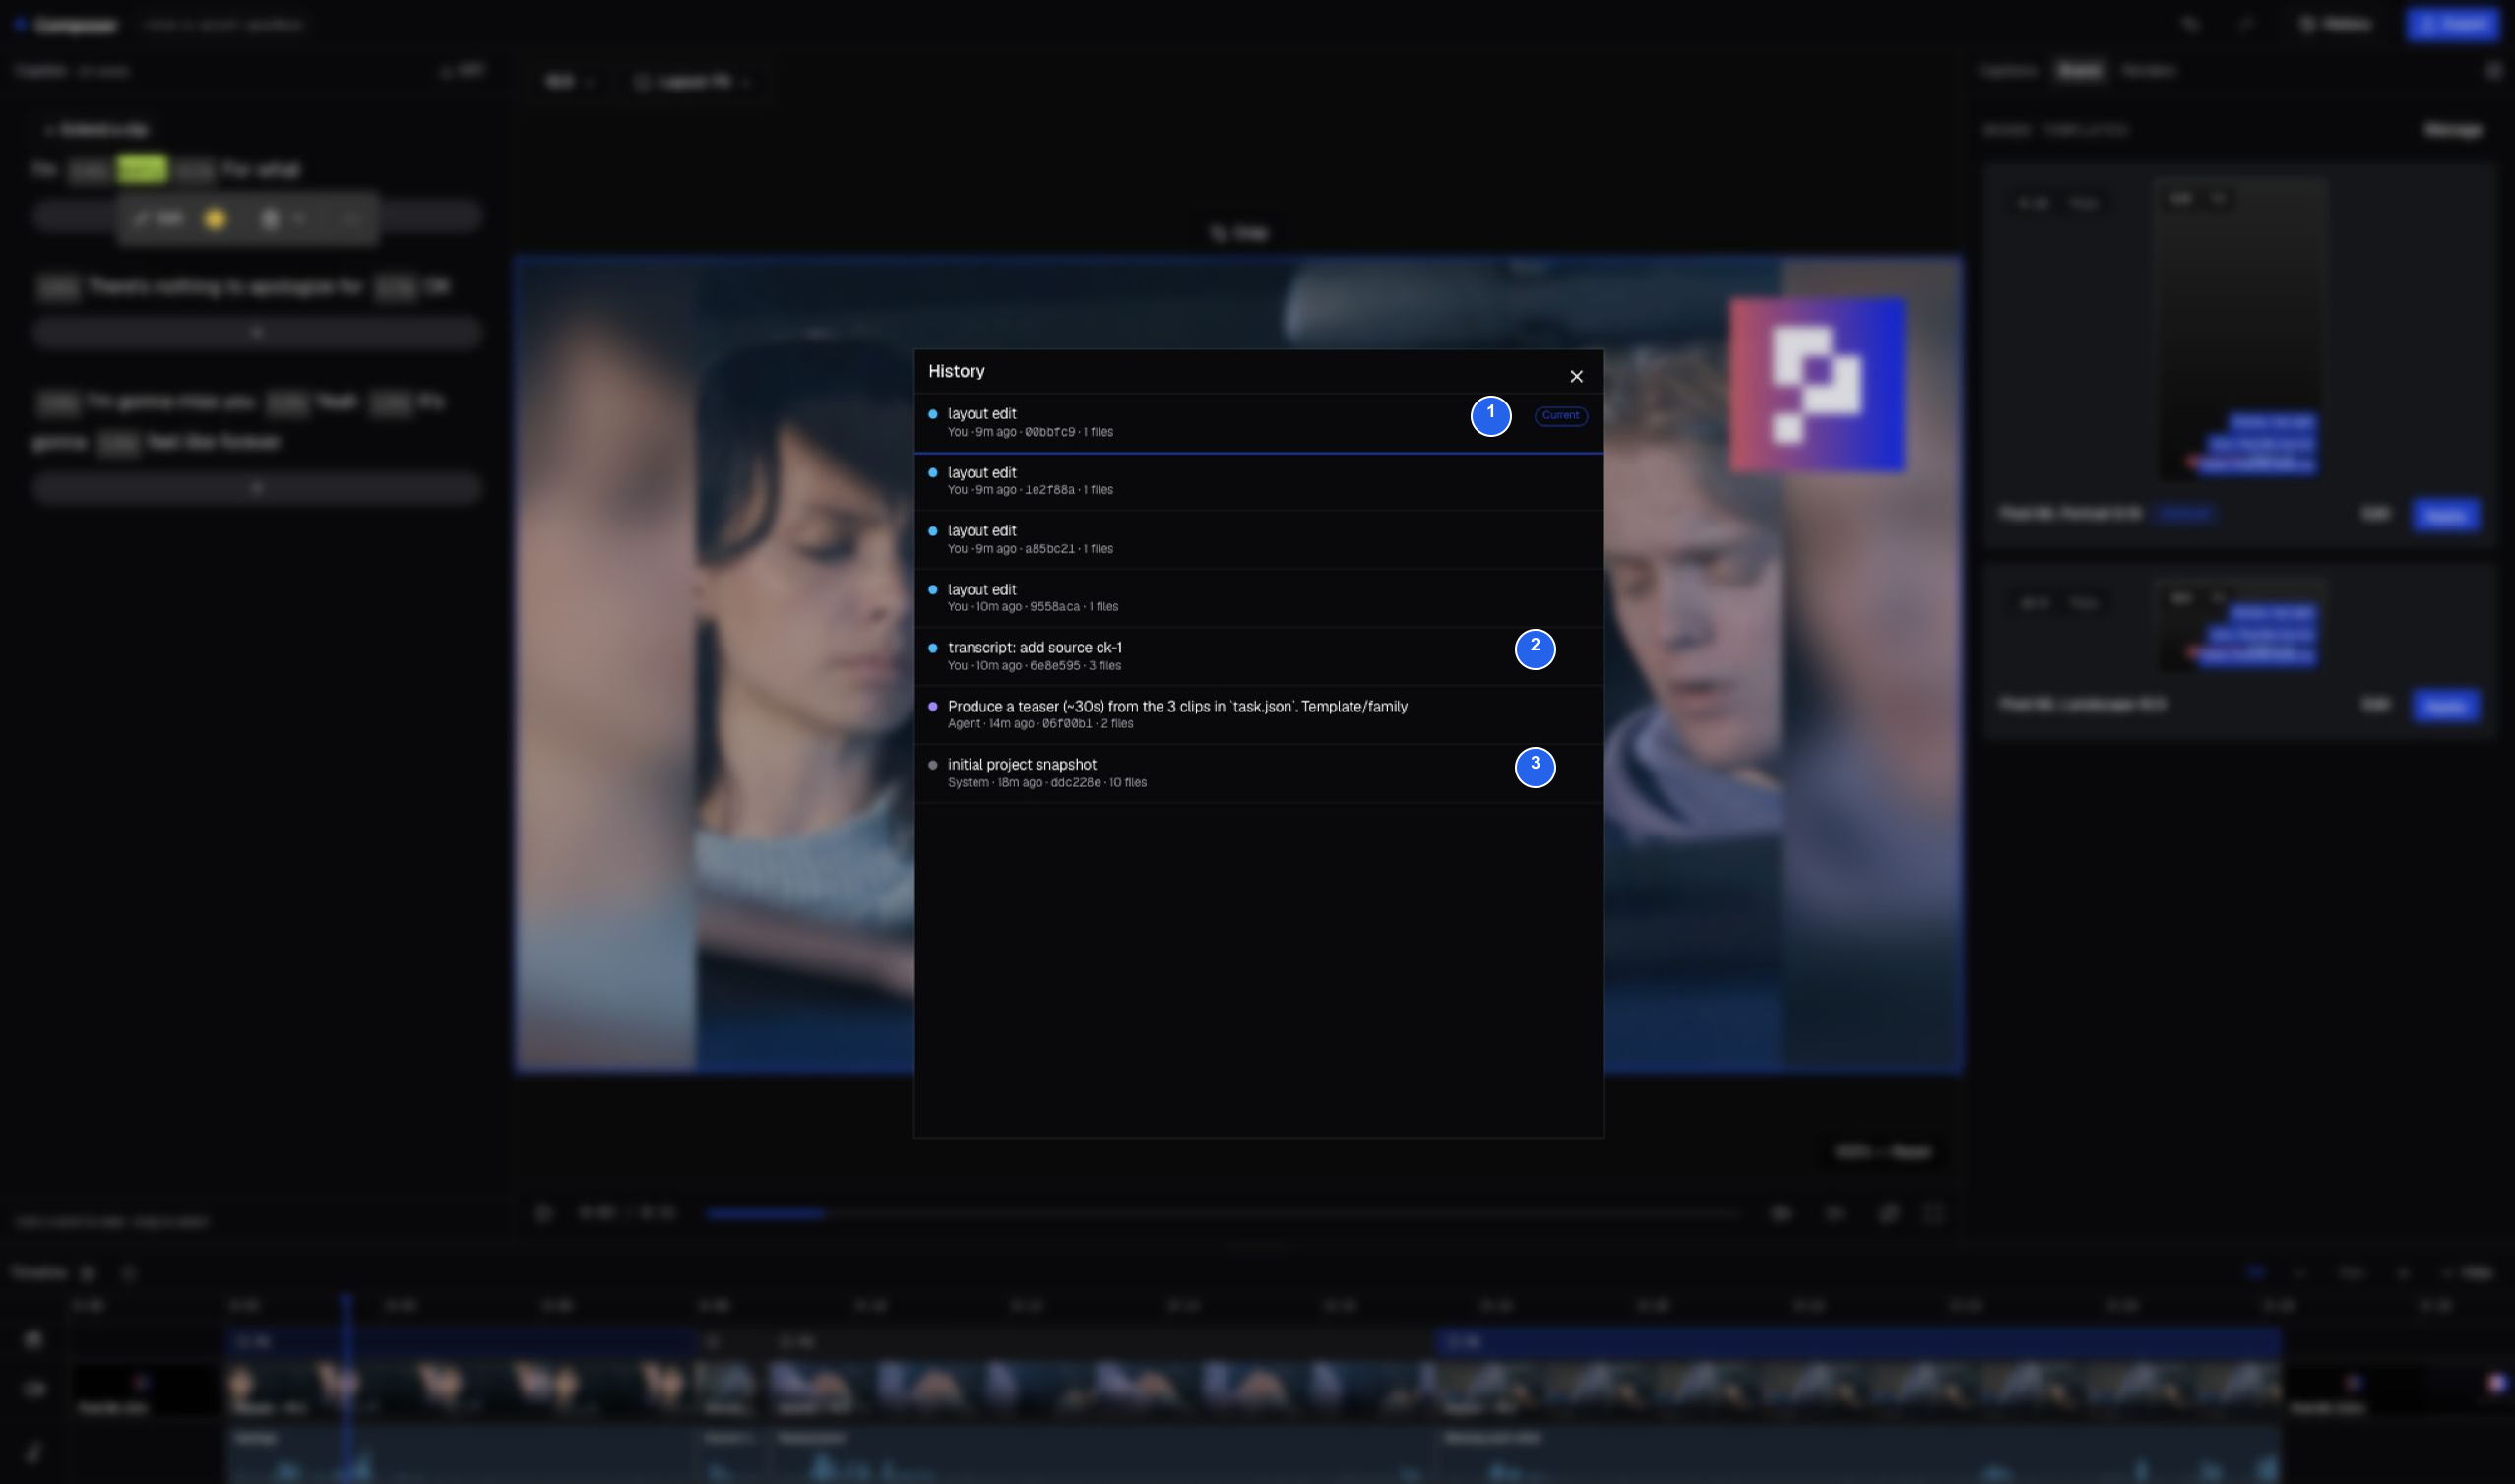
| # | Revision | What it tells you |
|---|---|---|
| 1 | Current | The active revision, including its action summary, author, time, short ID, and changed-file count. |
| 2 | Earlier edit | A previous user or agent change that can be inspected before restoring. |
| 3 | Initial snapshot | The baseline created when the Studio project was initialized. |
Open an earlier revision to inspect it, then restore only when it is the state you want. Restoring creates another revision, so the edit trail remains recoverable.
Review playback and the timeline
Use the transport bar for ordinary review and keyboard shortcuts for precise work.
| Action | Control or shortcut |
|---|---|
| Play or pause | Play button or Space |
| Step one frame | Left Arrow or Right Arrow |
| Step ten frames | Shift + Left Arrow or Shift + Right Arrow |
| Shuttle backward / pause / forward | J, K, L |
| Mute | Speaker button or M |
| Playback speed | 0.25×, 0.5×, 1×, 1.5×, or 2× |
| Loop | Loop button or Shift + L |
| Split a selected timeline item | S |
| Remove a selected timeline item | Backspace or Delete |
The timeline separates layout, visual clips, captions, and audio into aligned lanes. Use Fit to show the full project, or the minus and plus controls to zoom around a transition. Before exporting, inspect every cut at normal speed and one slow pass around any complex edit.
Render and export
Open Renders first if you want to inspect settings without starting a job. The header Export button starts a render immediately with the current settings; it is not a shortcut that only opens this panel.
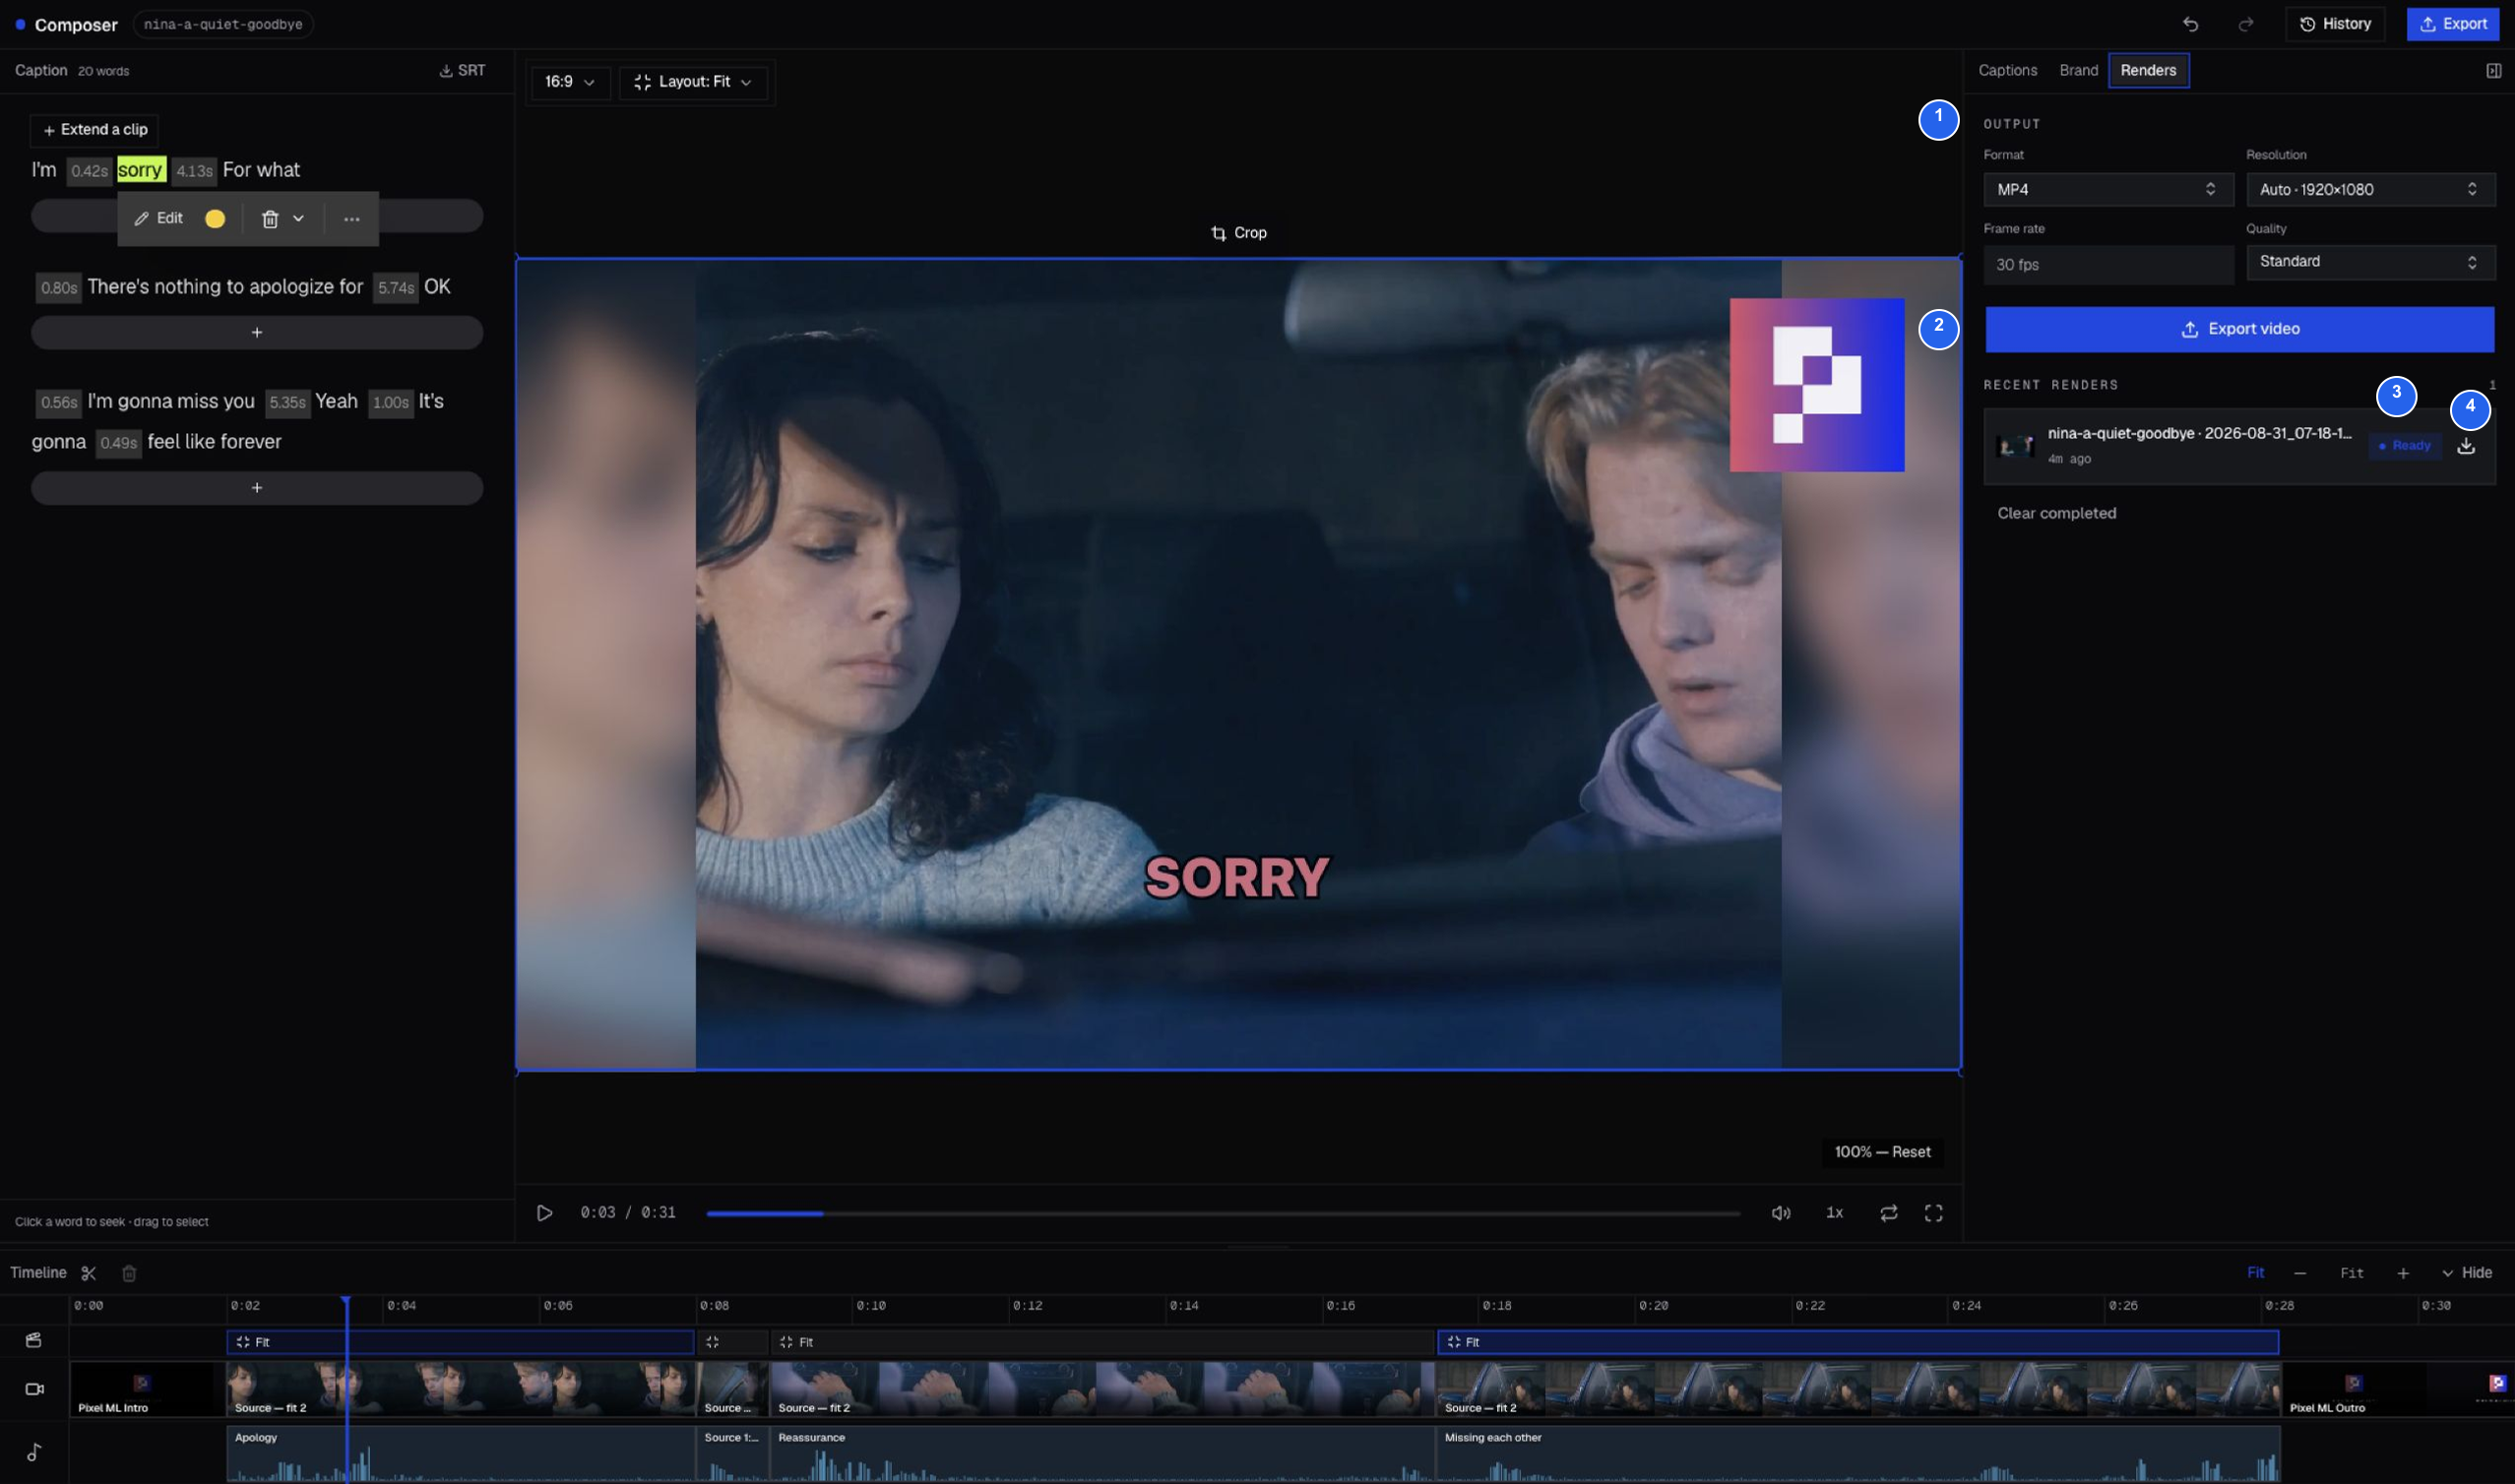
| # | Control | What to check |
|---|---|---|
| 1 | Output settings | This captured example uses MP4, Auto · 1920×1080, Standard quality, and a fixed 30 fps. Use the choices available in your deployment. |
| 2 | Export video | Start one render after caching and any active edit finish. |
| 3 | Ready | The render job has completed. It does not certify editorial accuracy. |
| 4 | Download | Save the finished file, then play it outside Composer before delivery. |
Increasing output resolution does not recover detail absent from the source. Nina was uploaded at 1440×1080 (4:3). The output canvas is 1920×1080 (16:9), with Fit preserving the foreground proportions.
Check the revised dialogue sequence
Review the apology → added response → reassurance → goodbye in order. The final draft displays 20 caption words and approximately 31 seconds, including the branded opening and ending. All four body scenes use Fit.
The render reached Ready in Composer. A Ready screenshot is not proof that the downloaded file has passed playback review; complete the delivery check below on your own output.
Final delivery check
- Play the complete video after caching finishes.
- Verify every cut, caption, highlight, crop, logo, intro, and outro that the project actually uses.
- Confirm picture, audio, captions, and the timeline stay synchronized.
- Reopen the project and make sure the latest edits are still present.
- Download the Ready render and play it outside Composer from start to finish.